Monday, February 23, 2009

Chapter II: The Canvas Painted

Two of the canvases are painted, and a third one begun - go see on the other blog!
My challenge on this one will be retaining the "look" of the watercolor, a process I thoroughly enjoy.

A Canvas Drawing tutorial

This is just an alert to send you to the other blog (Possibilities, etc.) to see an in depth canvas preparation tutorial I've started - with children's art, as that is a simple thing for learning and practice.
This one begins with the actual preparing of the original art, tracing to size, and drawing it onto canvas.

Friday, February 20, 2009

New Napkin Ring Charts

Now the napkin ring charts! My good friend and co-conspirator Pat Miller suggested that these could also be made longer - about 7" for a cuff bracelet, and a bit longer for a bangle - and make wearable jewelry. When I have time, I'll also see if I can make little earrings to match like I did with the beaded cuff bracelets last year on the other blog.

This first scan is the "set up" for the napkin ring (or bracelet). As I determined it should be approximately 1 1/2" high, I marked 27 threads, and then marked the center of the 27, which is the 14th thread. Also folded the canvas to find the vertical center and marked it at the top. By doing this, I was assured that the "jewels" would come out even - or stop at the same place on each end. A tiny bit of juggling a few threads doesn't hurt, as it doesn't have to be exact. Sometimes I just get lucky and it happens anyway. Also, I always mark two threads at top and bottom for the "edge" stitch, which is long armed cross stitch. It makes a lovely binding, and rolls over easily to make the finishing neater. (See the patchwork post for this edge stitch)


I decided to show the marked canvases lengthwise, as the resolution could be made larger so you can see what's going on when you print them out. i.e. easier to see and to count. The first scan is of the April jewel - the diamonds.

The second is the January garnets, and the third is the "string of pearls" for June. I hope soon to have time to stitch these things, but can't seem to do it in double time as I wish. (like the old Charlie Chaplin movies, where everything moved very fast.)
As for stitching, I always outline the jewels first - that is, stitch the gold mountings. (or silver if you prefer). The "jewels" may be made with beads or with bump stitches and sparkly thread. I love using the Renaissance Shimmer for pearls. The little "picot" edging I put on two of them may be done with a single bead or just left plain and background color inserted.
You may use your own ideas for color on these - and even change the jewels. I try to draw them the most typical cuts for the particular stones - except the garnets, which I always "see" as antique lavoliers, etc. I'm already seeing "Emeralds."

Thursday, February 19, 2009

Jeweled Napkin Rings (in needlepoint)

While working on my crazy quilt Birthday hearts yesterday, I had one lying on it's side on my work table - and noticed the "bracelet" of diamonds looking very much like a model for a napkin ring - sooo I've been doodling on canvas again.

Of course I had to also draw the garnets I did for "January" which is far from being finished. This is a replica of a piece of antique jewelry I found, stitched with Kreinik metallic gold 002V, and garnet colored beads from Sundance.
To be sure that my pattern was correct for this project, I consulted my daughter, who approved - I cut a T.P. tube piece that is 1 1/2" high - which comes to 5 1/2" long when spread out for a pattern. Her fine damask napkin looks spiffy in it, I think. She didn't voice an opinion - said she would wait until she sees the needlepoint version completed. The blue and green Splendor silk is what I chose to use as backgrounds - one above and one below the chain of jewels. (which are made with Sundance hexagonal clear #250 beads)

While I had the pen and canvas out on the table, what else could I do but continue? So the pearls emerged as a swag across the length of the shape. These will be stitched with the turquoise color I used on my June birthday heart - I do like the combination.
It's getting late, and I've had a busy day - so can't really think coherently. I'll give you the diamond pattern tonight, and do the others tomorrow with in depth instruction for putting them onto canvas.

Basically, if you want to go ahead and get it done, the canvas is cut 4" high x 8" long to accomodate the pattern, which is 1 1/2" high x 5 1/2" long. (on 18 mesh white mono-canvas - never use interlock for these).

Saturday, February 14, 2009

Drawing on Canvas: Addendum

The post I did on drawing on canvas was a kind of "hurry-up" job, as I am aware of Tony's cyberclass and a kimono that apparently has to be drawn. I have watched people struggle with the drawing of other projects on other blogs, and thought I might be of help in this regard - it is quite simple, but there are "tricks" etc. to make it right. Please feel free to e-mail me if you need further instruction, as my e-mail address is on my profile. Just PLEASE don't use pencil. The graphite will smear and make your threads dirty. (and Tony would have a stroke)

As for PENS, I have explained my preferences on my side bar - this is from 40 years of experience. I recently saw the suggestion that people use the Staedtler pens for drawing on canvas, and to let this dry for 24 hours. I keep a set of these gorgeous pens - 20 colors - but they are only used for my stitch guide illustrations, bargello patterns on graph paper, etc. No matter how long you let them dry on canvas, they will still smear when dampened. I have tested them thoroughly.

I also saw recently a shop owner blog who stated "Never use a Sharpie" - again, I have used these for many years. There are several kinds of Sharpie pens - the paint pen is not good, as it is oil based, but the ultra fine point pen is superb for this purpose.

Friday, February 13, 2009

Dot Addendum

I forgot to take pictures of the two instances of "dotted swiss" as I enjoy using it. First, the "JOE" mini-stocking cuff is not quite as plain and boring with the dots on it - in this case placed two stitches apart rather than one as on the chart in the post below.

The second picture is a close-up of a patchwork piece, made more interesting in the white background patches with the use of the "bumps" of the dots. They don't really show up well in this photo - but they are, as on the mini-sock, placed with two stitches between on the diagonal. The white dots on the green patch are Sundance beads.

DOTS!! Polka and Swiss

When I was in college, I had a year of rather intense study of textiles, in preparation for the degree in interior design. At that time - 150 years ago, the only synthetics we had were nylon, orlon, and rayon. (rayon is actually a vegetable fiber composite), so the emphasis was on fiber content and weaving techniques, with a bit of dye methods and chemicals thrown in.

This sort of thing really opens the eyes and gives one an appreciation of fabrics - and recognition when we see them. Very early in my needlepoint design activities, I decided that to alleviate the visual boredom of a plain background, I could dress it up a bit with woven fabric replicas, and dotted swiss was my first. (My mother loved it, so I wore a lot of it in my early childhood - mostly white.)

Dotted swiss was first made in the mid 18th century in Switzerland, where it was a beautiful, lightweight woven white cotton batiste with small dots woven in. Of course now it is also woven with synthetics, and the dots may be larger and applied - and lots of different colors are used. The dots, however, remain white.

I'm showing my needlepoint version in color in order to show the effect of the raised dots. I use this pattern on things like stocking cuffs and patchwork patterns to give a bit of visual interest. To begin, simply mark dots with your drawing pen on the WARP threads as you see them on the stitched model, and also on the chart.
When working in white, just basketweave the whole thing, but as you come to a "dot" you will make a cross, so that it appears as a raised bump. When using a colored background, leave the dots bare, and then make X's over them with white thread. The chart with the arrow is showing basketweave with the cross stitch creating the raised bump of the dotted swiss. The dots, of course, can be more widely spaced for a different effect.


While I was doing this, I couldn't resist going ahead and including one of my favorite effects - "bump" polka dots. These are just marked with little squares instead of a single dot - and worked with Smyrna cross. They could also be stitched in a variety of different colors and placed randomly for a "confetti" effect.
You can see by studying the scan of the marked canvas, that the squares are placed with two stitches between the dots on the diagonal - I have found this to be the easiest and least confusing way to do it - kind of automatic without having to count.
These very simple textured patterns are useful for things like plain background on ornaments - like a sprig of holly on a background that has no other pattern. Also, a little frame around a name or monogram works well. Lots of uses if you think about it!!


Monday, February 9, 2009

Drawing on Canvas

If you've ever purchased a painted canvas that you absolutely couldn't make stitch right, it was probably badly drawn before it was painted, as a well prepared canvas has to start with a good drawing - well placed on the threads where the stitches go. Too many commercial canvases these days don't take care to do this, and take the pleasure out of working them.
Also, I am seeing a number of people via the blogs who are wanting to draw their own, and I cringe when I look at them, as they make the classic mistake of drawing in between the threads (in the groove) instead of ON the thread.

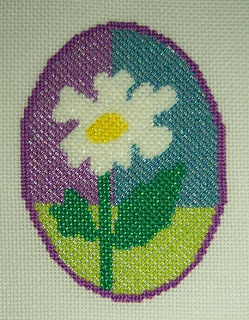
This little design was originally made as a brief but simple tutorial for teaching people to properly trace a design. It is only 4 1/4" high, but has the elements needed for learning and for practice. I used it one day to work on some beading techniques I was developing - the use of clear beads applied with the same floss as the background color. (very effective!)

I have asked Gail Hendrix and Anne Stradal to please not look at this issue of Freebies, as Gail will faint (she totally stitch paints everything) and Anne will raise her eyebrows, I'm sure, as she also stitch paints everything. She does what I do in many cases - she places the canvas over the master pattern and traces it, but she "stitch dots" as she goes. I haven't felt this necessary on most of my larger canvases, but I am fanatic about doing it on anything symmetric - and on other elements that need to be carefully placed to look right.

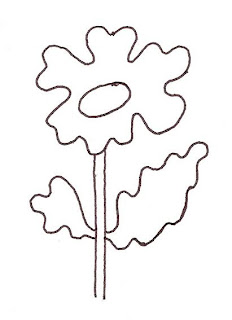
Anyway, the thing is to trace the design onto the canvas by placing it over the drawing, and do it CAREFULLY with a light touch - so as not to make an ugly, hard black line. I made the lines dark here in order to show up well.
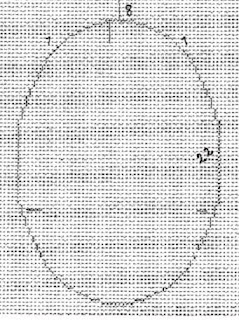
This is the oval around the flower design if you want to try the whole thing. Draw it onto canvas first before you trace the design onto it - following the instructions given previously for other symmetric shapes.

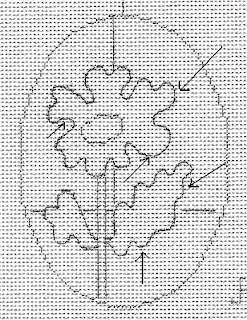
I have marked arrows on the drawing on the oval to illustrate that I took care to hit the THREAD as I went around curves, etc. and not slip into the groove between the threads. This makes a design soooo much easier and prettier to stitch, and if the canvas is drawn this way, it will naturally be painted this way as well. I stitch traced the flower center out of habit - and will change, (if I decide to do anything with it) the upper left side of the center. This just involves dotting out what I did with white acrylic paint and re-doing it.

Incidentally, this drawing is the actual size of the real canvas (I think it is, anyway) so you can trace directly from it after printing it out.
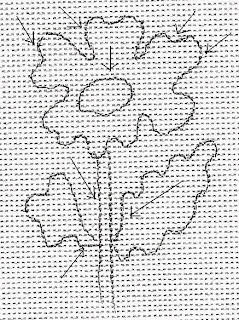
On the next oval with the flower, I have purposely drawn it badly - see the arrows. This was very difficult for me, as my habit after 40 years of designing painted canvas was
nearly impossible to break. With those lines in the grooves between the threads, the poor stitcher has to make a decision about where to put the stitch to make the shape of the curve look right.

I'm including this simple tracing of the design in case you want to re-size it and use it for something else - it's great for practice! Just enlarge or reduce as you wish, and use it for something clever!!


Thursday, February 5, 2009

The Napkin Ring Chart

I got a lot more stitching done on this napkin ring, but had to put it down, as deadlines are pressing for other things - there is enough done, I think, that you can see what it will look like. There is more background info on the other blog from yesterday's post.

I'm not sure I like my choice of the white Petite Frosty Rays for filling in the area above and below the main pattern - and might take it out and substitute cotton floss. I do, however, like the effect of the Petite Frosty Rays for the hearts and outer Bargello bands, as they look a bit "puffy" and sparkle a little bit too. I used silk for the flowers, as that's what was in my stash in the right color - and the leaves and edges (long armed cross stitch) are worked with cotton floss.

The piece is only a fraction longer than 5 1/2", which is a great size for the napkin ring - so it's best to start in the center where the marking is. Just follow the chart for the upright stitches, and insert the little flowers, which are done with smyrna cross. I changed the chart a little bit, as I had made two mistakes on the stitched version - not a miscount, but a visual thing regarding the look of the placement of the heart.

The chart is presented here vertically, as I could get a larger image to print out - enjoy this, and by all means use your own color choices!! Incidentally, this piece made a bit longer - 7" or so - would actually work for a cuff bracelet!! Earrings could be made with the little flowers. There are some I did quite some time ago on the other blog under "beads" or "jewelry" or something like that.

Wednesday, February 4, 2009

Needlepoint Napkin Rings in Bargello

A coming attraction for tomorrow - see these on my other blog. I'll put the pattern here when I get it corrected and drawn - this was just a "trial run." Gershwin music is calling tonight on TCM - a whole day of glorious music, beginning with The Great Caruso.

Meanwhile, click to enlarge and see how very simple it is!