Monday, November 30, 2009

Crazy Quilt for December!! (already)

Unbelievable that it's already December (in a few hours). I finished this piece last year in October, and, shame on me, I still haven't finished "January."
This is in my "Crazy for Birthdays" series - and the history, etc. of the turquoise and narcissus as symbolism is on my other blog - you can click on Birthday Crazy Quilts to see them all - at least the ones I managed to finish. I'm still short a few, but now am involved with Talavera - and will have to give up sleeping in order to get it all done. It's good to be busy!!

I used some of my favorite special effects on this one - the glitter of the Sundance hexagonal #250 crystal clear beads against the white Petite Very Velvet - looks like ice crystals here. Also, the clear beads - again, #250, but not the hex beads - agains the dark blue PVV looking like rain drops. This is explained on the other blog if you want to go look!

ADDENDUM: The "Crazy for Birthdays" hearts are available as E-patterns on my web page, Elegant Whimsies - downloadable for printing out! Several people have asked.

Wednesday, November 25, 2009

Stitching Talavera: A Basketweave Mini-Tutorial

I've shown this cross on the other blog, as an example of what a difference using Kreinik blending filament can make - and now that I'm stitching it, thought it might be a good one to show a bit of basketweave that seems to confuse people who aren't totally familiar with it yet.

This piece is also the subject of my tutorial on "Creative Needling" a design, as I made a much smaller cross from a big one in my file. Getting started, I rarely paint canvases I'm going to stitch for myself - and especially working on this one with the navy background! Hard on the eyes, it is.


Anyway, the vertical arrow is pointing to where I have the needle inserted, ready to take the next stitch traveling "up the stairs" to the end of the row - worked on the WEFT stitches, which are dips.

The upper arrow demonstrates where I stopped at the angle where the arm of the cross starts, as I couldn't continue downward at that point. I had started stitching in the corner of the arm - the upper right corner, so after traveling up and down for a few rows, it will meet the spot where I stopped stitching.

This way, the row going UP will be one smooth, long row. This is another of the reasons one should ALWAYS adhere to stitching up on the weft, and down on the warp - as two rows going the same direction will look really awful on the surface of the work. You can see this more clearly on the close-up - the cross itself is outlined first with navy Kreinik #12 braid in the 018HL. It looks great against the almost matte finish of the cotton floss (DMC)


I also outlined the design elements with the metallic braid, and then stitched the floss around them - it shows up well!! I didn't do that around the green things, though, as it would have been too busy. Perle cotton (DMC) is used on the red flower, and if you look closely, you can see the Kreinik blending filament twinkling on a few stitches on the yellow and green parts.

I've worked a lot more on this one, and tomorrow, if there's a bit of time, I'll show the result on the other blog - and show what a wonderful thing the blending filament is! Great effects.

Wednesday, November 18, 2009

A "Jeweled" Butterfly in Needlepoint

I rarely get to see any of my designs with the stitching finished - but today I went to borrow one of my Celtic Crosses from the world's finest finisher (here in Austin) - Vikki Pinson. I actually spotted a design I did about ten years ago or more when I was in my binge of adapting antique jewelry to needlepoint all stitched - and stitched so beautifully. What a surprise!!
Anyway, I dug into my files and found the chart I had made for this thing, so thought it might be of interest as a Freebie. I didn't take a picture of the original painted canvas, so this color scheme is a nice surprise! Very pretty, and probably chosen by the lady who stitched it.

To re-create this for yourself, just follow my instructions in previous posts about drawing on canvas - I'm showing two different shots of it on canvas - one with the green leaves outlined to make it easy (also the gold around the jewels). I have no idea what threads she used on it, but it's really sparkly and glittery. I think the background is maybe Kreinik braid #032,, and it's worked in skipped basketweave. This sparkling butterfly is intended for a tree ornament - and I do hope I'll get to see it finished. Vikki will transform it!!

Tuesday, November 3, 2009

Paintbrush Tutorial for "Paint Your Own Canvas"

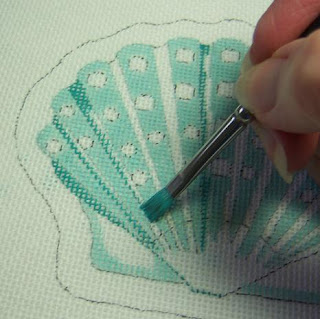
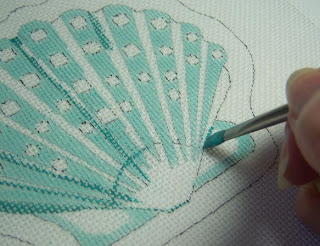
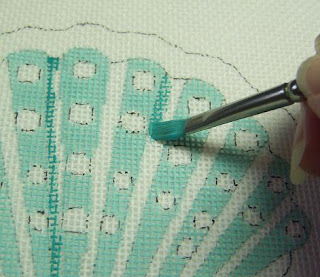
While painting things I have on order, I decided to go ahead and take pictures as I go, to explain things - pictures are clearer than words in these cases.

I've been amazed to see in several publications the advice to buy cheap paint brushes. This is faulty information, as cheap brushes are difficult to use, time consuming, and downright aggravating for painting on needlepoint canvas.. They wear out so fast one actually spends more in replacing them. I've even seen some that shed bristles!

I use, when I paint on needlepoint canvas with oils (my more serious and traditional designs require it) ONLY fine sable brights, which I purchase through my Dick Blick catalog. (a wonderful book for an artist to go through - I shop in this catalog like my daughters do in J. Crew) In these pictures, I'm using acrylic paint, which my sables don't like - but I'm out of the ones I use normally for painting with acrylics.

I'm illustrating here the fact that when using a good brush in really good condition, one can use a larger brush for several purposes, thereby cutting down on time in cleaning out one brush, putting it down and reaching for another, etc.

This is a #4 size sable bright (NEVER use "shaders" as the bristles are long, so are too soft and flexible to squish the paint well down into the canvas). The picture shows that the brush, well cared for, can actually paint a thin line on just one thread of canvas! Then, turned, it can paint the flat areas as well. - very convenient. As for the flat areas, I do one side in this manner, and then turn the canvas and put the "chisel" edge against the opposite side, as it makes a smooth, clean line against the adjacent area.

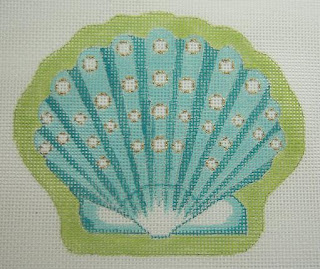
The last photo is the finished canvas. I used the Sakura Pen Touch fine line paint pen (gold) for outlining the "pearls." This was a great find for me, as it really cuts down on time spent painting gold outlines with paint and a brush. (and no brush to clean afterward)

This scallop shell is from a series of "Jeweled Sea Treasures" I designed about six years ago. I had discontinued these, but kept the patterns - which is fortunate, as I had an order for several of them from a nice customer whose shop was buying from me then.

The shells in the series were based on actual sea shells, anatomically correct, but I painted them in the bright pastel "Caribbean" colors, and added jewels, which were mostly stitched with Renaissance Shimmer and Sprinkles in smyrna cross and other "bump" stitches.

ADDENDUM: I do have a book on "Paint Your Own Canvas" - which is available in my web store, Elegant Whimsies. It's listed as an "e-book" in two chapters, which you may download and print out yourself at about half the price of the bound book also showing - Just click on "E-Books" under "Our Designs"

Be sure to also click on the "labels" below to see more canvas painting instruction - and also on the other blog, Possibilities, etc.

Sunday, November 1, 2009

Crazy Quilt Heart for November!!

November already! Time does fly, and I need to get the January "Crazy for Birthdays" heart finished, as that will be here soon - I got distracted last year, and stopped in the middle.

Anyway, the colors are so pretty for November - with the gold topaz and the chrysanthemums! The warm "velvet" of the burgundy patch feels fine against the kind of "stormy" blue - and the dark blue with snowflakes or raindrops (Beads)

I looked forward to changing the header and choosing background colors - a great toy!.

This is available as an e-pattern on my Elegant Whimsies site - it's a bit complicated to offer as a Freebie, but the heart outline is here, and this might give you an idea or two.