skip to main |
skip to sidebar
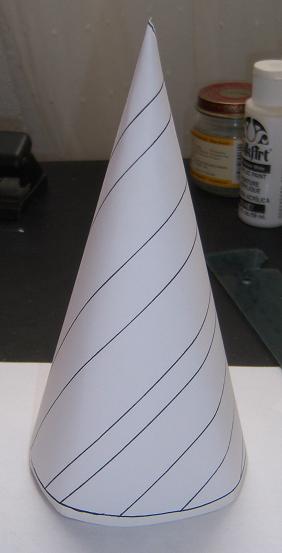
 At this point, the project is beginning to be exciting, as new "happy accidents" occur. I have the flat paper sketches and the cone appearance of these on the other blog, but wanted to show what I discovered late last night!By moving the orientation of this tree on canvas, I can use either my diagonal laces and trims or the horizontal laces and jeweled chains, etc. to make the spiral around the topiary.The first photo shows the paper cone I drew with the lines parallel to the straight lines of the pattern. Incredible, I think, how it looks like spirals - which gave me lots and lots of new ideas!
 By putting the top of the tree this way on the canvas, the lines are at 45 degree angles, so will accomodate easily my diagonal laces and "jeweled" chains, etc.By turning it so that the straight sides are on the threads of the canvas (it also takes less canvas this way), I can do the horizontal/vertical laces and trims - and some of my RIBBONS!! also candy canes. Strings of candy corn, etc. - lots and lots of things for decorating a table top for a special occassion.
 (No matter which way the pattern is oriented on the canvas, it will still finish as spirals.)The second picture shows an old project with my "cotton lace," which is a horizontal lace.
 The leaves are on one of my very first pieces in crazy quilt long ago, where I worked out leaves as a seam treatment - they are worked on the horizontal or vertical, and are great with French knot "berries."At this point, I'm just wishing I could stitch as rapidly as I think. However, there are days that I can't think at all, so am grateful for small, mindless pieces to stitch to keep me going.
 I have myself rather twisted and confused right now about what to put on which blog - but this is where the pattern should be, I think, and the actual stitching on the other one.. Anyway - this is how I went about arriving at it for now. These drawing implements are very old, but I'm very attached to them - so please excuse their appearance. I used the triangle to make the 90 degree angle necessary for the top of the tree, and drew lines down each side with my black felt tip pen. This one is 7" tall.
 I decided to make the foliage/background shaded by needle blending, so needed to mark off the five spaces required to use two shades of a color. I divided 7 by 5, and then made concentric marks with the compass for the pattern.
 Next, I marked the exact center of the conical pattern, and made black marks on the side so that I can make sure they are in the same place on both sides on the canvas - things need to meet when the cone is closed to make the tree.
 I was playing a bit with the white paper cone while it was on the stiff poster board model, and then opened it out - surprising how these things look! It's difficult to envision those curved lines becoming straight bands on the tree. I decided to add three to the canvas I'm going to stitch, as I want to make swags or something there. Notice how the straight vertical lines look when the paper is opened out. The rest of the story for today is over on Possibilities, etc. - including a bit of the stitching.
 This next scan is the pattern itself - I have sized it to about 7", but you can always print it out and make it smaller or larger.
  This is the drawing on canvas, and the arrows are pointing to show that the lines end on each side on the same thread - a fingernail may be run across the canvas to make sure they are where they need to be. I marked the needle blending lines in black, and the three horizontal decorative bands in blue. I didn't feel it necessary to stitch count these curved lines on this, but care must be taken to make them neat.NOTE: The stitching, which I began last night and showed on the other blog, has a serious glitch in it. Therefore, better judgment ruling in the morning light has shown me that I needn't do the five section separation for needle blending, but should simply use the four sections made by the "swag" lines, which are shown in blue on this pattern. I would not do the five separations unless I were going to do basketweave on the background. As it's already drawn onto the canvas, and I have begun stitching, I will simply ignore the black concentric lines, and just use the blue ones as separation.The bottom is stitch counted so that it will sit nicely and not wobble or be lopsided when finished. There is a little mark showing the center thread at the bottom. I'm showing this sideways because it wouldn't fit in my scanner with the top upright - the bottom is too wide. This pattern must be drawn with the point at the top. It requires more canvas, but won't stitch well at all if placed as I did the original one with the holly leaves. It's very easy to draw the 90 degree angle by just finding the center thread on the canvas, and making dots 7 inches down on each side from the top point. The concentric curves may just be traced very carefully by putting the canvas over the pattern you made.
 I found an old photo in the bottom of a box, dated 1998! I had painted these things, conical topiary trees, for the cash/carry market in Phoenix in 1997 - and then discontinued them after about two years. (I do this when I'm tired of painting something.) Anyway, I decided it would be fun to resurrect them and stitch a few for myself - and make a tutorial on how to do your own! I have learned and developed so many skills, stitches, and techniques, and become acquainted with zillions of fine novelty threads over this span of years, so think it would really be fun - and not just for Christmas! I will show some stitching on Possibilities, where I have just now posted a tutorial on how to make a pattern - but will do the canvas preparation in detail here on this blog - so stay tuned in to both if the project interests you - it might be fun!
 I cannot believe another month has gone, and I have produced so little for this blog - another very stressful change of address was in the middle of this one, but as soon as I find my drawing equipment and paint brushes, I'll be back working.Anyway, this is "December" from my Birthday Crazy Quilt series - and probably my favorite besides April and August. It has lots of symbolism in the mistletoe, holly, narcissus, and the birthstone turquoise. (Tanzanite or blue zircon is the alternative used now, I think). I also like the effect of the blue patch with "rain drops," and the white with glittery snow.I started these almost three years ago, but still haven't produced January, February, or July. Incidentally, these are now available as e-patterns on my web page, Elegant Whimsies, so you can put your own onto canvas.
 At this point, the project is beginning to be exciting, as new "happy accidents" occur. I have the flat paper sketches and the cone appearance of these on the other blog, but wanted to show what I discovered late last night!


