Monday, August 31, 2009

Crazy for September

It won't be September until tomorrow, but after a dry, sweltering summer (again) in Austin, we all look forward to, hopefully, the time when at least at night it starts to cool off a bit.

Anyway, the header is constructed from my "A Heart for Birthdays" series of crazy quilt designs. September is about Sapphires and Asters and beautiful cooler colors than last month.
If you haven't seen the CQ for birthdays things, they are on the other blog, and are quite an exercise in silk ribbon embellishing and "beads on the painted canvas."

Saturday, August 29, 2009

For Halloween Decor

Playing with little Halloween motifs again - this time a bat and a witch. My thought, of course, was still for table settings and napkin rings, but Pat Miller, over at Needleartnut blog, suggested putting the little circles of my napkin rings onto larger circles, or even on diamond shapes, for ornaments on dowel sticks to make decorative and festive centerpieces. Pat is stitching my Jolly Roger pieces - so do go there and take a look, as her stitching is imaginative and thread choices are lots of fun!

I had also thought about stitching more circular background around them (even bargello) and making kissing balls to hang or to just sit on the dining table and on side tables for the "season."

Anyway, I have already given you a tutorial on drawing circles onto canvas - you can find these under the label "canvas preparation." This first circle is 3 1/8" diameter, and is good for inserting the smaller one (the moon) to make a small ornament. Actually, 3 1/2" would be better, but I can't find my drawing, and I'm too lazy right now to do another.
The second scan is the small circle, 2 3/8" diameter, that I use for the "moon" on the napkin rings. To insert it into the larger circle, draw the big one FIRST, mark the centers lightly, and then count up 21 threads from the horizontal center and make a mark to begin the top of the smaller circle. These center marks can be easily dotted out with white acrylic paint.
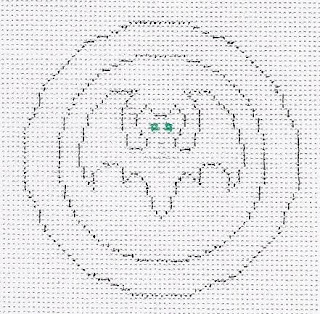
And now the new motifs! I had to give the bat green eyes, and the witch has a silver hat band and an orange scarf. I had intended just a black silhouette against the yellow/orange moon, but couldn't resist a bit of color here.
Enjoy! - and see what you can come up with for further decoration.


Thursday, August 27, 2009

Spook Season: The Jolie Rouge

I finally got this one done - the red version, which is thought to be the oldest form and the origin of the name "Jolly Roger." This was supposed to signify BLOOD and the fearsome things the pirates would do if the ship under attack didn't comply and "surrender the booty." The name means, in French, "pretty red."

Working now on a bat and a witch. These are on 18 mesh canvas for needlepoint - but could also be worked on the same count Aida for counted X-stitch.

Sunday, August 9, 2009

Halloween Time! Motifs for Projects in Needlepoint (or X-stitch)

I've neglected Freebies for a few weeks due to being incredibly busy - but this has been brewing in the back of my mind for quite a while. Today I needed a break, so have played on canvas all day, and think these might be fun.

First, my proudest achievement - the emblem from the Jolly Roger! I used a white Deco Color Paint Pen, fine point, to draw it on black canvas, which is what it needs. I'm thinking the canvas could be stitched with something open with a bit of sparkle in it, and would probably do the skull and crossbones in DMC Satin Floss for the high shine.

I'm showing the drawing on white canvas, as it would be easier to use as a guide for drawing your own, I think.

Next, the cat. This is a black cat against a moon - I didn't have time to paint them, but I think it's actually easier to work from the pictures of just the drawing. I thought to put the fence all the way across, which I'll probably do if I ever have time to stitch the full set.


As napkin rings in previous posts demonstrate, these should be 5 1/2" long, so you can simply mark the top and bottom lines across the canvas from the center - 2 3/4" each way. The band is just under 2" high, which is a little wider than my usual, which is 1 1/2".This cat, of course, should be solid black with a green beads placed for it's eye.

The moon would be a soft yellow, and the background maybe dark blue with a few silver or Kreinik #032 braid stars (dots) sprinkled around.

The spider is hanging from a silk thread, which I'll make with Kreinik silver braid on the warp (bump) stitches, and a bead on each of the weft stitches in between. I think the web might be fine in DMC Satin Floss in light grey or something of that sort. The spider definitely needs green beads for her eyes.


I did run these critters by the grandchildren to make sure they're identifiable, and they met with high approval and shouts of glee.

Last, the pumpkin. I didn't have time today to make it into a napkin ring, but it would fit well in this shape if the leaf on the left is eliminated. My thought with doing it on a small circle is that a larger circle could be worked around it, and maybe filled in with bargello - even 4-way.

As for threads for this, there is a Petite Very Velvet that is absolutely perfect for the pumpkin, with the outline done in a darker orange DMC floss!. I'll do the leaves, if I have time to do this one, with Satin Floss for the shine. The cut-outs on the face will be stitched with YLI black Shimmer Blend ribbon floss. Great effect with different textures!

Another way to use these motifs would be to put them on flatware holders. These look rather like large scissors cases, or what I've seen some designers do as "door tassels." About 5" high by 3" wide at the top. Great seasonal table decoration!

The round ornament could be finished on a styrofoam ball and sit on a festive table (with hat pins in the bottom) for a centerpiece.

If you haven't printed out these as patterns for your own use before, the easiest way I've found is to click on the image to enlarge, then click on "file" and "print preview." It will print out large enough to see easily and then you can draw it onto canvas. Experiment with different threads, etc. and have fun with your own creativity!