Judy is in Hospital and very ill. More details will be posted here or at her main website.. www.elegantwhimsies.com
My name is Steve Watkins and I am a friend and long time webmaster for Judy. Her family has asked me to help out with the internet aspects of Judy's life. I have limited access to these blogs and may not be able to update this post. We will try to keep this blog updated but due to our limited access that may become a problem.
I do have unlimited access to her main website and will be able to post updates on her condition there, if this blog becomes unavailable to us. Please check both places for information.
For people with outstanding orders please contact me at steve@starnetservices.com and I will do the best I can to help you...
Steve Watkins
Monday, February 21, 2011
Sunday, February 13, 2011
Kreinik is Wired!!
 I've been plodding along on this conical topiary for several weeks - just trying to get enough background done to play a bit and see what I could work out for special effects in surface embellishment. The Kreinik metallics have been wonderful, as usual, (I will explain this on the other blog), and just at the best possible moment, I received in the mail a few spools of it to try.
It's very much like the DMC Memory Thread, but is the metallic we all love from this company. This is one of my most favorite colors - and in the #16 braid, which is all that's produced in the Hot Wire series.
played with making shapes, and worked this out on a pair of fat knitting needles. (for smoothness and symmetry)
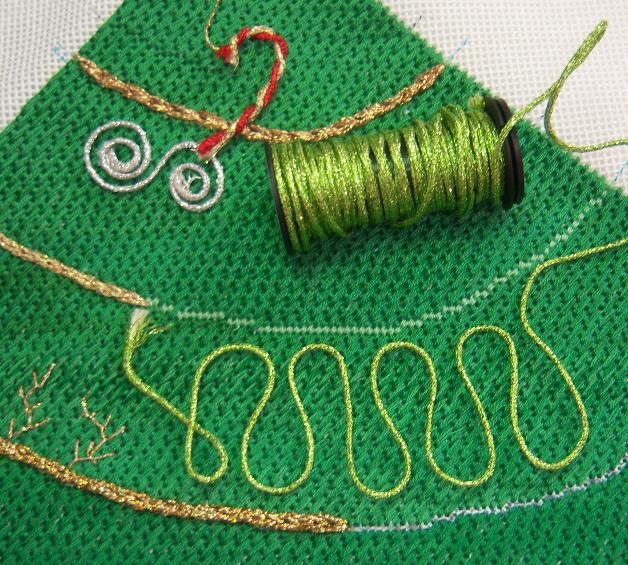 The method of handling is the same as for the DMC Memory Thread, which I have covered for needlepoint under the label "DMC" on the other blog. I can see a lot of possibilities for this loopy "fret," as it reminds me of the "cloud filling" I did from Sharon B's (Pintangle) stitch challenge last year.
 This is also seen under DMC on my labels list on the other blog. It will require some manual manipulation to get it right on that curve, which will appear horizontal when the tree is upright.
A few weeks ago, I saw an ornament with a cording made with DMC Memory Thread, so I decided to see if I could twist the Kreinik. Due to it's nature, it isn't easy unless you have a little device for doing it (I don't) - so you need to cut short lengths, hold it tightly at both ends, and twist. Fun little tiny candy canes! 

While looking at these, think also of the posts I did a few weeks ago on the plain and simple triangular trees - they would be great to play with in this manner!! I'll show the conical topiary sometime tomorrow with updates!
Thursday, February 3, 2011
More Free Small Motifs for Valentines
 Emma Broidery, on her DMC blog, has some really fine small things for downloading and print out. These, of course, will do equally well for counted X-stitch or for needlepoint. On 18 mesh needlepoint canvas, the largest will only be a little over 1" wide - Some great ideas are already popping into my head, such as repeating one or two of them to make ribbons or borders.
 You can go to the side bar on the right side of this blog called "Good Stuff," and click on the "Emma Broidery Blog" button to see all of them.
I'm thinking about asking Emma's permission to stitch a few and show some variations, etc. It's great to get the creative juices flowing!!
Tuesday, February 1, 2011
Free "Small Patterns" from Liz Morrow!!
 Liz Morrow (Lizart) is celebrating the first year anniversary of her web page, where she has delightful patterns to sell, by offering a new free pattern called "Small Things."
 These are delightful tiny patterns that could be inserted into bigger ones, or they might be used as a central motif for building something a bit larger around them. Remember that charts work as well for both needlepoint and counted cross stitch.
You can download this and print it out - just click on the "free design" button to see it. The web page is HERE.
Monday, January 17, 2011
Shells for Ornaments
 I found two more pictures of sea shells - these were for a friend who wanted to decorate a small tree for her studio (a finisher).
 They are relatively small, at just 4 3/4" high for the blue shell, and 5" high for the yellow one before adding the outline for finishing. Of course you could enlarge either of them, and even put them on larger mesh canvas for a pillow or purse inset.

I may decide I need to stitch this blue one for myself, as I see Petite Very Velvet for the blue areas - or could even use a different color. Then the Kreinik #12 braid in 002V or the Vintage silver (can't remember the name of it right now, and my color card is in a drawer across the room).
The "nacre" finish of the pink/orange lip needs to be done in DMC Satin Floss, and the pearls are bump stitches with Renaissance Shimmer or Rainbow Gallery Flair.

I didn't add jewels to the yellow one, as I like the markings and the "shine" on it better.

I hope you enjoy these and can use them for yourselves and as gifts. There are lots of tutorials on this blog and on Possibilities, etc. to guide you in canvas prepraration if you haven't seen them. I'm still working on the trees, as I can see them as table settings through all seasons - or on the mantel.
Thursday, January 13, 2011
More Patterns for Sea Shells
 I actually found the file folder with my sea shells in it, so will present them here for your use and enjoyment. There are plenty of tutorials and instructions on this blog, here and there, to get you started drawing and painting on canvas. The outlines, of course, could also be used for other things, both needlework and other painting related crafts.
 The outlines are the shapes of actual shells, (in the range of 5 1/2" high) but I had a lot of fun painting them in exotic colors instead of the realistic ones. You could always consult a shell dictionary for that if you would rather do the "real thing."


I can see the potential here for some really pretty threads, such as the DMC Satin Floss in the "pearl" interior of the shell.


Please excuse the tilted drawing - it's late, and I was too tired (lazy) to remove the thing from the scanner and straighten it out. I hope you enjoy these, as I have several more I want to show in the next day or two.
Tuesday, January 11, 2011
Wonderful Color Schemes!
 For any who didn't see my post a few weeks ago on Possibilities, be sure to visit this site of Kristina's and watch her develop color schemes from her beautiful photographs.
 I especially like the way she shows these swatches with the colors in proportion to how they show in the pictures.
As this is a "freebies" blog, you are usually in the position of selecting your own colors, so this would be a great aid in doing so when dumping out the stash to pull out what you want to use for a project. Besides, it's interesting to see what she has added each Monday.
Go to Kristina Klarin's blog to see!! Be sure to click on "colour files" on the left side panel to see the swatches without the pictures. (in storage)
Subscribe to:
Posts (Atom)

