Showing posts with label canvas preparation. Show all posts

Tuesday, December 28, 2010

More Festive Topiaries!!

At this point, the project is beginning to be exciting, as new "happy accidents" occur. I have the flat paper sketches and the cone appearance of these on the other blog, but wanted to show what I discovered late last night!

By moving the orientation of this tree on canvas, I can use either my diagonal laces and trims or the horizontal laces and jeweled chains, etc. to make the spiral around the topiary.

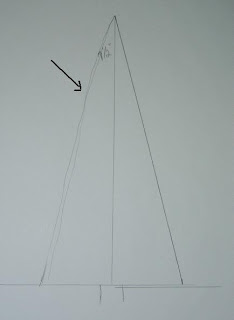
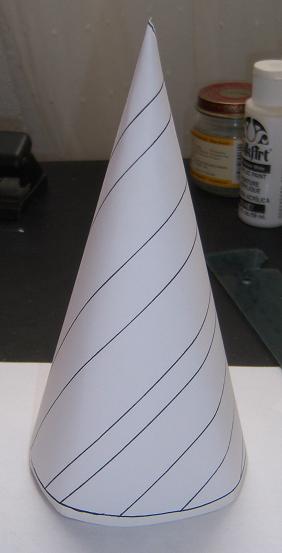
The first photo shows the paper cone I drew with the lines parallel to the straight lines of the pattern. Incredible, I think, how it looks like spirals - which gave me lots and lots of new ideas!

By putting the top of the tree this way on the canvas, the lines are at 45 degree angles, so will accomodate easily my diagonal laces and "jeweled" chains, etc.

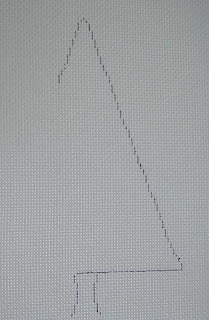
By turning it so that the straight sides are on the threads of the canvas (it also takes less canvas this way), I can do the horizontal/vertical laces and trims - and some of my RIBBONS!! also candy canes. Strings of candy corn, etc. - lots and lots of things for decorating a table top for a special occassion.
(No matter which way the pattern is oriented on the canvas, it will still finish as spirals.)

The second picture shows an old project with my "cotton lace," which is a horizontal lace.

The leaves are on one of my very first pieces in crazy quilt long ago, where I worked out leaves as a seam treatment - they are worked on the horizontal or vertical, and are great with French knot "berries."

At this point, I'm just wishing I could stitch as rapidly as I think. However, there are days that I can't think at all, so am grateful for small, mindless pieces to stitch to keep me going.

Sunday, December 26, 2010

The Topiary Tree! (in needlepoint)

I have myself rather twisted and confused right now about what to put on which blog - but this is where the pattern should be, I think, and the actual stitching on the other one.. Anyway - this is how I went about arriving at it for now.

These drawing implements are very old, but I'm very attached to them - so please excuse their appearance. I used the triangle to make the 90 degree angle necessary for the top of the tree, and drew lines down each side with my black felt tip pen. This one is 7" tall.


I decided to make the foliage/background shaded by needle blending, so needed to mark off the five spaces required to use two shades of a color. I divided 7 by 5, and then made concentric marks with the compass for the pattern.


Next, I marked the exact center of the conical pattern, and made black marks on the side so that I can make sure they are in the same place on both sides on the canvas - things need to meet when the cone is closed to make the tree.
I was playing a bit with the white paper cone while it was on the stiff poster board model, and then opened it out - surprising how these things look! It's difficult to envision those curved lines becoming straight bands on the tree.

I decided to add three to the canvas I'm going to stitch, as I want to make swags or something there. Notice how the straight vertical lines look when the paper is opened out. The rest of the story for today is over on Possibilities, etc. - including a bit of the stitching.

This next scan is the pattern itself - I have sized it to about 7", but you can always print it out and make it smaller or larger. This is the drawing on canvas, and the arrows are pointing to show that the lines end on each side on the same thread - a fingernail may be run across the canvas to make sure they are where they need to be. I marked the needle blending lines in black, and the three horizontal decorative bands in blue. I didn't feel it necessary to stitch count these curved lines on this, but care must be taken to make them neat.

NOTE: The stitching, which I began last night and showed on the other blog, has a serious glitch in it. Therefore, better judgment ruling in the morning light has shown me that I needn't do the five section separation for needle blending, but should simply use the four sections made by the "swag" lines, which are shown in blue on this pattern. I would not do the five separations unless I were going to do basketweave on the background. As it's already drawn onto the canvas, and I have begun stitching, I will simply ignore the black concentric lines, and just use the blue ones as separation.

The bottom is stitch counted so that it will sit nicely and not wobble or be lopsided when finished. There is a little mark showing the center thread at the bottom. I'm showing this sideways because it wouldn't fit in my scanner with the top upright - the bottom is too wide.

This pattern must be drawn with the point at the top. It requires more canvas, but won't stitch well at all if placed as I did the original one with the holly leaves. It's very easy to draw the 90 degree angle by just finding the center thread on the canvas, and making dots 7 inches down on each side from the top point. The concentric curves may just be traced very carefully by putting the canvas over the pattern you made.

Monday, December 20, 2010

A New Project: Topiary Trees in Needlepoint!

I found an old photo in the bottom of a box, dated 1998! I had painted these things, conical topiary trees, for the cash/carry market in Phoenix in 1997 - and then discontinued them after about two years. (I do this when I'm tired of painting something.)

Anyway, I decided it would be fun to resurrect them and stitch a few for myself - and make a tutorial on how to do your own! I have learned and developed so many skills, stitches, and techniques, and become acquainted with zillions of fine novelty threads over this span of years, so think it would really be fun - and not just for Christmas!

I will show some stitching on Possibilities, where I have just now posted a tutorial on how to make a pattern - but will do the canvas preparation in detail here on this blog - so stay tuned in to both if the project interests you - it might be fun!

Friday, November 5, 2010

Drawing Trees to Enhance and Embellish

This is a project that I have played with many times over the years I've stitched and designed needlepoint. It's a very very simple thing that anyone could do - skill at art and drawing isn't necessary, and with a knowledge of lots of fun decorative stitches, amazing affects can be achieved.

One of my favorites a few years ago was a little grouping of three to five trees of different sizes, heights, and widths to sit on the mantel at Christmas time. I had little stands made with a base and a dowel to fit into a pocket on the back of the tree so that they would stand upright. I wish I had one to show, but I gave them all away.

Anyway - all you have to do is decide how tall you want your tree, and approximately how wide - so the tree will be tall and skinny or short and fat or whatever.

I first drew a straight line across the bottom, and then, using the triangle, drew a vertical line to designate the center. It's marked at 7 1/2" high.

In the second picture, the arrow points to the left side, which is a sketch to show me the shape my tree will be. Then, the bottom is marked at 2" each side of the center, and a straight line is drawn from top to bottom on the right side, using the triangle as a straight edge. (because it was convenient). I added the little trunk freehand.

The next picture is the 5 1/2" tree I drew, using the same center line and base line, but cutting the center off at 5 1/2" high, - and drawing the line down to the 2" on each side, just as I did for the taller one.

At the bottom, you can see where I played with sketches for changing the shape, and then traced them onto tracing paper to use for my trees if I wish.

Drawing the tree onto the canvas is a simple thing - and you may use whatever mesh size you please for this project. Just place the canvas over the drawing with the center line exactly on a canvas thread so it will be symmetric.
The easiest way, if you aren't a perfectionist, is to use a straight edge and draw the line from top to bottom on each side. I've given several tutorials on this blog about drawing with a pen on canvas - a simple thing.
On this picture, I've begun to stitch draw the side, as I insist on symmetry. You can see where I started to copy on the left side what I've done on the right. I keep a little bottle of white acrylic paint on my table, and a trolley needle to dot out mistakes and re-draw them.
These little trees make a great small, bright project that one can do quickly, and they are a wonderful way to use up stash threads and practice stitches and new techniques and effects. You might just make horizontal bands of decorative stitches (I've actually seen these sold as painted canvas with stitch guides), or fill the whole tree with a multi-colored stitch.

I hope to find time to get a few ready to embellish with surface treatments and embroidered effects I've been wanting to try out! If you wish, just print out these drawings for yourself, and then enlarge or reduce them as you want them - an easy thing. I do recommend a coat of acrylic paint if you intend to use stitches that might allow the white canvas to show through - the "dandruff" effect.


Thursday, July 22, 2010

Drawing and Designing Crosses: another tutorial

I had intended to post the drawing of the flowers for the cross in the previous post, but found these - and thought it might be fine to encourage you to draw your own sizes and shapes - and then put the flowers on them if you wish.

I have put pictures on the other blog of two I made long ago when I was practicing silk ribbon embroidery - and started making crosses for gifts for Godparents and ornaments and Christenings - all kinds of fine uses! When trying out new techniques and learning new things, I decided to put them to good use while I practiced!

Anyway, to draw your own, this is how it begins: These are sketched onto tracing paper - kind of squiggly and rough, but O.K. to determine size, etc. Just ideas that pop into the head from time to time. These are very simple Latin crosses, so easy to draw onto canvas when you get the size right. Actually, any piece of white paper is fine for doodling. I have saved copy paper I was going to discard just for this purpose.
When you have done this, and have a size that suits you, simple make a good tracing with tracing paper and a black felt tip pen (I use the Paper Mate for this, but NEVER use it to draw on canvas). I also use a plastic drawing triangle, utilizing the 90 degree side. Then, fold the tracing in half and mark the center fold with a pencil - this gives you guidance for placing the pattern elements - as the jewels, etc.

I found this scan of a drawing I had made on canvas - to use as a model. I had marked the lines and diagonal intersections where I intended to put a bead. These things must be worked out first, as it's a mathematical thing of being centered and symmetric - very very simple.

Just mark the center of the canvas - on the thread unless you have something in mind that is even numbered (as the cross in previous posts), and work from there. It's always good to make a scan of the drawn canvas for future reference. This one is 6" high on 18 mesh canvas.

The next one is very small - made as an ornament. It's 5 1/4" high on 18 mesh canvas. It's on an even count, as the little "gold beadwork" border is Smyrna crosses with Kreinik gold braid (#12). Very easy to draw!! Also, it has many many possibilities for jewels and color schemes.

On this one, if designing your own, it's good to start with the jewels first - and then work outward to make a nice arrangement of the borders. I worked these in simple slanted gobelin.
The next scan shows how the canvas looked when drawn. I had to do some juggling at the corners, as the Smyrna cross bumps wouldn't fit there. This is O.K. I had to do this, as to make them fit would have messed up the shape so that the jewels wouldn't fit like I wanted them to.


The second of these is on an odd count, and the arrows are pointing to the corners, where the 2 x 3 stitch "jewel" wouldn't fit, so I simply placed a "Smyrna cross" size there.


This one, again, could be worked in many different colors, etc. I started with exactly the same tracing as I worked with when doing the little one with the round jewels.

I have posted two pictures on Possibilities, etc. of crosses I made years ago when first working with silk ribbon embroidery and beads. I got tired of wasting little pieces of canvas - and my time and threads, so started doing small crosses. At least these were useful at gift giving occassions when such things were appropriate and appreciated!

The last one is a piece a drew for a friend who requested it. It's small- and I had to do some juggling to get the lettering and placement of the words to fall into the shape I needed to use - it worked well, and she was pleased.

Notice at the corners (where the arrows point) that the count didn't quite work out the way it should have, so I simply "rounded" them. The one stitch inside the gold "chain" was for insertion of a bead or a cross stitch with a sparkly thread (to make a bump) to resemble a jewel

This is such a very simple process - I hope you will be encouraged to try it for yourself - and be very imaginative!! I'll do the flower tracing in a few days, with also thread and stitch suggestions.

Thursday, July 15, 2010

Drawing the Cross onto Canvas

I'm having to plagiarize my own canvas, as all I had for reproducing it was an old photograph, which I enlarged on my color copy machine.

The first thing to be done was to figure out the size of the thing. I managed that by counting the little "jewel" things across the top (11 of them) and then down the side. I drew it out on scrap canvas and measured it - the cross is 6 1/4" high on 18 mesh canvas without the little 3 thread border.

Of course you could do it proportionately larger by putting it onto 13 mesh instead of 18. Having determined the height and width, I could cut canvas the right size. I like to leave at least 1 1/2" all around - 2" if I'm doing it commercially so that people will have the option of putting a background for use as a Bible cover or framing.

You can see that this is on an EVEN count, as the jewel is four stitches square - perfect for a little Smyrna cross "pearl." So - one must mark the center of the canvas at the top for guidance by drawing a line in the GROOVE between the threads. If the count had been odd - one would make the mark ON THE THREAD.

Incidentally, you might play with this format, and make a larger, very interesting cross by making the jewels 3 x 3 stitches in stead of the 2 x 2 I used here. There are all kinds of possibiilties for stitching and decorating!! Next, just go around the cross from the first little jewel.

I find it very very easy just to "eyeball" draw without having to count stitches by only making two marks - you can see where the arrows point. Then when finished, you can go back and fill in the missing spaces. This way you can concentrate on counting the jewels and not the stitches.

I marked the corners just to show where the border will be. Be sure from time to time to check yourself - run your thumbnail down a thread and make sure everything lines up. This one is so simple, but one can get "off count" if not paying at least a little attention.

The third picture shows the outside drawing complete.


At this point, you might figure out something of your own to do with the shape instead of doing it like mine. I have charted for people things like "With Faith all Things are Possible" - simple things. OR a wonderful interesting background with lots of silk ribbon flowers on it.
I only sketched in the stripes with two different blue drawing pens (sharpies). I left them incomplete, as I'm not sure what I'll do with the center - probably go ahead and show you how to trace the flowers onto it for stitching - but you could also just leave the center with no painted flowers and do the silk ribbon variety instead. I'll give you the tracing next time for the flowers.

Setting up these stripes originally was easy, - as, again, it's on an even count, so making the three dark blue stripes 2 threads wide, and two wider light blue stripes (4 threads wide) was logical. Try also making a much smaller cross by using maybe only 5 or 7 "jewels" across the top - and proportionate on the rest of the shape.

Be imaginative, and enjoy the process!! The color picture of the painted cross is on a post just previous to this one in case you missed it!

Wednesday, July 14, 2010

More "Paint Your Own Canvas": A Floral Cross

I found this photograph, as I have found so many long forgotten, while cleaning out boxes after a major move of residence. This one is a scan of a photograph, as I painted it long before I had a digital camera and computer - a VERY long time ago.

As I remember, I drew and painted this for a class I was teaching in trying out different techniques and canvas preparation. I think this is the one which led to my deciding to start using silk ribbon embroidery for flowers on crosses and then, later, crazy quilt adaptations.

Anyway, over the next week or so, I intend to give you here the instructions, starting with cutting the canvas, in detail for drawing it onto canvas yourself - and then suggestions for stitching.

There are plenty of tutorials on canvas preparation now here and on my other blog, Possibilities, etc., to help you know which pens and which paint to use, and how to use the paint brushes, etc. etc.

This is a more advanced Freebie, and I hope you put it to good use and enjoy it!! Just please remember that it's for your own entertainment and for giving as gifts either as a painted canvas for stitching friends or as a stitched and finished piece - but NOT for sale as a painted canvas.

For more detailed instructions for Painting Your Own Canvas, I have the book in two chapters now as an E-booklet on my web page, Elegant Whimsies. Under "our designs" just click on E-Books.

I think this has confused some people who have only seen the coil bound version. This is the downloadable, much less expensive version, as you receive it almost immediately upon purchase, and may download and print it out yourself. I revised it and added a lot more color, newer materials and techniques.

Sunday, April 11, 2010

Designing a Jeweled Fish (in Needlepoint or X-Stitch)

While looking at the painted canvas, I realized that this could also be done in counted cross-stitch on a colored fabric! The model is on 18 mesh canvas, so each little dot/stitch can be reproduced with a X-stitch on the fabric - on graph paper, this would appear as one square, so you might want to chart it that way first.
Anyway - this is a fish I traced from a book on tropical fish (can't remember the name of it right now), and then played with it a bit on doodle canvas to get an idea for embellishment - and voila! "jewels"!!

The jewels are on a 90 degree angle, which follows lines I drew first to get some ideas - and it worked! The jewels are in a setting of Kreinik metallic braid - #12 both in 002 gold and in silver for the little smyrna cross "beads." These are marked in blue on the canvas to easily distinguish from the gold settings.

To do your own, you might just follow what I did - or trace the outline of the fish (or find yourself a new one in a book or on the internet) and figure a wonderful and original pattern.
I'm planning to stitch several of these, as well as some shells I drew a number of years ago, on the other blog soon. On this fish, I'm seeing petite Very Velvet (Rainbow Gallery) with my favorite effect of the 002V metallic braid and lots of sparkle in the jewels. Also some DMC Satin Floss here and there for a great contrast in texture. I'll have some more shell freebies soon - I've been awfully busy lately, so am running behind.
ADDENDUM: For right now, I have the comments cut totally off, as a few nights ago, I had a horrendous spamming episode - and the only way I could stop it was to block and remove the entire comment section. I did this on the other blog also to take no chances. After this, I'll do the comment moderation thing, which I really didn't want to do. Oh well.

Monday, March 8, 2010

PAINT YOUR OWN CANVAS 2nd chapter

I worked very hard over the weekend, and astonished myself by finishing Chapter II and putting it onto the web page. Now I deserve a rest, and another "swim" with the coral reef critters.

This chapter shows, mostly in pictures, detailed instruction in drawing the pattern, putting it onto canvas, and painting - even as to how to hold the paint brush and how to fill it with paint.

This is a downloadable e-booklet that you can print out yourself, so may be purchased by those interested who are from countries outside the U.S.A., as there is no "mailing" involved except by e-mail.

Monday, January 11, 2010

A Project in Plaid for Needlepoint: An Egg

Learning to create and then stitch a plaid is one thing - knowing how to set one up for a project is another. I decided to do an egg with an initial on it - but it's been a while, so I made a few mistakes, which I'll show anyway. Errors in judgment. "Haste is the enemy of perfection" etc.

I decided it needed an oval with the initial - but I miscounted when drawing it on, and it is quite lopsided. On this first picture, I had painted it out and re-drawn it.

Anyway, I consulted, again, my favorite little book on letters - the French book I bought at The NeedleWorks here in Austin. (Colleen keeps this one in stock, and will gladly sell you one if you contact her.)

A word here about the charts in these books - they are, of course, graphed, and intended for cross stitch - but I have used them for many years for needlepoint, as all one has to do to translate is to make a tent stitch for every little square instead of a cross stitch as you would on fabric. Quite simple.

I wanted to put the initial into an oval, so the first thing to do, after I drew (stitch counted for symmetry) the egg outline, was to sketch an oval on tracing paper, ink it when it looked right, and then put it under the egg on canvas.

It was centered on an even count, as I wanted to outline it in Smyrna crosses for a different effect with pearl cotton. Then, the letter was centered on the oval - which was done with a DecoColor paint pen in green. The next thing was to "size" the checks I originally wanted to use - scale is very important on a specific piece, and using tiny little narrow stripes wouldn't look right - so I settled on four threads wide. Then - decided just a plain gingham would be boring, so I did the four thread pink stripes, but put six threads of white, split by two threads of light green in the center - thus creating an actual "tartan."

I made the marks with the Sharpie paint pens so they're easy to work on. By doing this, you can see how a plaid develops, as you add and substract the number of threads - and add more colors if you wish. At this point, you'll start noticing plaids everywhere you go!! - and figuring out how you'd work them into a needlepoint project.

In the photo you can see the stripes as they are stitched - beginning, anyway - and the arrows point to where I was one thread off centering the initial. I cannot count correctly late at night. Those marks around the egg are kind of "hairy" looking - but they'll disappear in the finishing. Just looking at this thing, I started to visualize all kinds of things one could do with an egg shape and fun fibers!! Put things we've learned to good use.

One thing I failed to mention - that you can see in this last picture, is that I made a decision to center the pink stripe. I made a sketch to scale on drawing paper first, and placed the canvas over it - adjusted it to see which would be most effective as the center motif. If you count them, you can see that there are seven pink stripes (including the very edges) and six of the white/green/white stripes. As pink is the predominant and stronger color, I wanted to use the format of 7.

Wednesday, November 18, 2009

A "Jeweled" Butterfly in Needlepoint

I rarely get to see any of my designs with the stitching finished - but today I went to borrow one of my Celtic Crosses from the world's finest finisher (here in Austin) - Vikki Pinson. I actually spotted a design I did about ten years ago or more when I was in my binge of adapting antique jewelry to needlepoint all stitched - and stitched so beautifully. What a surprise!!
Anyway, I dug into my files and found the chart I had made for this thing, so thought it might be of interest as a Freebie. I didn't take a picture of the original painted canvas, so this color scheme is a nice surprise! Very pretty, and probably chosen by the lady who stitched it.

To re-create this for yourself, just follow my instructions in previous posts about drawing on canvas - I'm showing two different shots of it on canvas - one with the green leaves outlined to make it easy (also the gold around the jewels). I have no idea what threads she used on it, but it's really sparkly and glittery. I think the background is maybe Kreinik braid #032,, and it's worked in skipped basketweave. This sparkling butterfly is intended for a tree ornament - and I do hope I'll get to see it finished. Vikki will transform it!!

Tuesday, November 3, 2009

Paintbrush Tutorial for "Paint Your Own Canvas"

While painting things I have on order, I decided to go ahead and take pictures as I go, to explain things - pictures are clearer than words in these cases.

I've been amazed to see in several publications the advice to buy cheap paint brushes. This is faulty information, as cheap brushes are difficult to use, time consuming, and downright aggravating for painting on needlepoint canvas.. They wear out so fast one actually spends more in replacing them. I've even seen some that shed bristles!

I use, when I paint on needlepoint canvas with oils (my more serious and traditional designs require it) ONLY fine sable brights, which I purchase through my Dick Blick catalog. (a wonderful book for an artist to go through - I shop in this catalog like my daughters do in J. Crew) In these pictures, I'm using acrylic paint, which my sables don't like - but I'm out of the ones I use normally for painting with acrylics.

I'm illustrating here the fact that when using a good brush in really good condition, one can use a larger brush for several purposes, thereby cutting down on time in cleaning out one brush, putting it down and reaching for another, etc.

This is a #4 size sable bright (NEVER use "shaders" as the bristles are long, so are too soft and flexible to squish the paint well down into the canvas). The picture shows that the brush, well cared for, can actually paint a thin line on just one thread of canvas! Then, turned, it can paint the flat areas as well. - very convenient. As for the flat areas, I do one side in this manner, and then turn the canvas and put the "chisel" edge against the opposite side, as it makes a smooth, clean line against the adjacent area.

The last photo is the finished canvas. I used the Sakura Pen Touch fine line paint pen (gold) for outlining the "pearls." This was a great find for me, as it really cuts down on time spent painting gold outlines with paint and a brush. (and no brush to clean afterward)

This scallop shell is from a series of "Jeweled Sea Treasures" I designed about six years ago. I had discontinued these, but kept the patterns - which is fortunate, as I had an order for several of them from a nice customer whose shop was buying from me then.

The shells in the series were based on actual sea shells, anatomically correct, but I painted them in the bright pastel "Caribbean" colors, and added jewels, which were mostly stitched with Renaissance Shimmer and Sprinkles in smyrna cross and other "bump" stitches.

ADDENDUM: I do have a book on "Paint Your Own Canvas" - which is available in my web store, Elegant Whimsies. It's listed as an "e-book" in two chapters, which you may download and print out yourself at about half the price of the bound book also showing - Just click on "E-Books" under "Our Designs"

Be sure to also click on the "labels" below to see more canvas painting instruction - and also on the other blog, Possibilities, etc.

Wednesday, October 21, 2009

Creative Needling the Painted Canvas

My dear friend Inge Wooley, with whom I've done business and collaborated for most of the last 37 years, was here visiting her daughter over the weekend - and we had a wonderful visit! Quite refreshing it was, as we did our usual discussions about what we're doing now and going to do in the future, and laughing about the times we had when we first met (accidentally in 1972) and started what became Creative Needle, a line of painted canvases that remains well respected among the timeless and traditional genre of design.

However, I've been trying hard to drag her into the 21st century and see the wisdom in producing some smaller, fun, and less expensive pieces that there aren't enough of out there - mainly because I want to turn over to her my new little Talavera crosses.

She chose three - and we started doing what we call "creative needling" - so I thought it might be interesting to share this process, so you can see what's involved in getting canvases ready to produce and market - and help people understand why the painted canvases are expensive.
She liked the one in the first photo, but the other two are the smaller, six inch crosses, so we had to manage to "creative needle" this one to make it fit. This is a process of making whatever changes need to be made to make the design easier and faster to put onto canvas, thereby keeping the cost down.

Things have to be considered, like the time it takes to draw and then paint them, as hired help has to be paid - and colors and general "feeling" have to be maintained.

The first thing that had to be done was to make this one smaller - down to the 6". (it ended up being 6 1/4", but that's fine). So - first I made a tracing with a black felt pen on tracing paper of the outline of the 6" cross pattern.

Then, I placed this over the big one, and traced the elements of design - and also cut down on the amount of diaper pattern showing, as it takes time to count and paint that. This is a rough tracing, but all that's necessary for this step.

Then, I moved a few things around, and made a better, smoother tracing, and placed the canvas over it and started drawing. I copied the counted symmetric elements from the original - as the lotus looking things on the shaft, and the red flower. I ruined several before I got it like it needed to be. (Hopefully I can stitch this one).

The drawing on canvas looks light, as I don't intend to paint it for myself - I rather like stitching on the white canvas, like a coloring book. Also, I'm too lazy to paint one just for me.

Anyway, basically, "creative needling" simply means taking one of my designs and eliminating what doesn't have to be there, and making it more feasible for mass production. Some things simply aren't worth it, as the resulting price would be too high by the time it got to a retail store..

I have one big Talavera pillow and one big Imari design that I absolutely love, but I cry and threaten to discontinue them every time someone orders one - it takes me three or four days to put each onto canvas and paint it, which means I make very little money doing it - but it's good for my ego, as it makes me look smart.

Friday, September 18, 2009

More Drawing and Painting on Canvas (about pens)

I was painting one of my large and more difficult Talavera crosses last week (this seems to be the Month of Talavera for some reason), and decided to take a few pictures as I go along to illustrate some of the process.

When drawing a design onto canvas for commercial reproduction, one must especially take care that the correct materials are used - beginning with the drawing pen. As I've said, for many many years, all that was available that was safe was the Pilot black pen (this became available in red and blue several years ago, but I didn't have any use for those colors, as they were too bright).

This pilot pen was available at most needlepoint shop, as the preferred pen, and I bought mine for many years from my wholesaler in boxes of 12. Needless to say, I'm delighted with the colored Sharpies now available, as it makes my drawing more efficient.

The example here is the diaper pattern (latticework) on the background of this cross. It's a medium blue when painted, but drawing it with the Sharpie ultra fine point light blue pen makes it much much easier not to confuse with the black lines when I start painting, as the design is totally stitch drawn. The drawing pen is just that - it is for DRAWING, and not for painting. I will custom mix the blue I need in paint, and go over these blue lines later. This really makes it easier, and the lighit blue of the drawing pen won't show through the paint. Also, I used a light orange to mark where the small orange areas will be, as the black ink is hard to cover, and there is no outline in this area to mask it. The yellow is paint. I had already done that when I decided to take pictures.

This is important, as a canvas that is painted for wholesale marketing must look NICE when on the wall in a shop. A good drawing is also the foundation of a painted canvas that separates the good from the bad, in that a well drawn pattern is easier to paint, and therefore easy to stitch.

Also, there is the time factor. It would be counter-productive to be drawing every little area with a different colored pen - it just isn't necessary! Nor is any other time consuming activity, such as heat setting ink that isn't color fast or that won't dry immediately. (also, heat setting would damage the canvas - weaken the sizing and probably turn it yellow)
Next is showing the beginning of the painting process. If there were a green paint pen this exact color, I might use it - but it's much much less expensive anyway and generally faster to just use the good old paint and brush. NEVER use cheap brushes, as needlepoint canvas chews them up fast, and it's totally aggravating to try to do precision edges with a worn out paint brush. I'm showing the correct position of the painting - the flat, chisel edge of the brush is up against the line - with a good brush in good condition, this is extremely easy.

The second "painting in process" picture shows cleaning up the outline and filling in tiny spaces with a round pointed #2 brush - not a "liner," but just a "pointed" paint brush. You can see in this case that the green paint covers the black ink lines well - so no need to go scratch up a green drawing pen, although I do have one. This is more efficient, as I didn't have to stop and start, put one pen down and open another, etc.
Also, there is a dark green outline added that would cover the black ink even if it did show.
Also, NEVER use the "shader," as the bristles are long, so are too soft to smush the paint easily down into the canvas. I use sable brights when painting my better canvases in oil, but for small things for which I don't want to spend a lot of time mixing colors, I just use little bottles of acrylic. My fine sable brushes don't like acrylic paint, so I buy something else at the craft store.


I've just discovered these fine little plastic containers made by Rubbermaid. The acrylic paint will stay wet for a week or more, and as I always mix my colors, even the bottled kind, it's essential that I be able to keep the mixtures I use most.

I've already shown the use of the PAINT pen in a previous post - the one where I painted the white lines on top of the already painted blue area. This saved lots and lots of time in assembly line painting several of the little crosses at once, as it cut down on processes.

So - to make a long story short, drawing pens are for drawing on canvas, and paint pens are for painting. If one is so fortunate as to need the exact color of one of the paint pens, it's fairly easy to just use it - however, it's quicker and more efficient to do it with just plain old paint and a brush. Absolutely no need to have a huge stash of assorted markers and pens etc. These can run into an expense, whereas the little bottles of paint and few paint brushes of different sizes are much less expensive and a lot more efficient in the long run.