Judy is in Hospital and very ill. More details will be posted here or at her main website.. www.elegantwhimsies.com
My name is Steve Watkins and I am a friend and long time webmaster for Judy. Her family has asked me to help out with the internet aspects of Judy's life. I have limited access to these blogs and may not be able to update this post. We will try to keep this blog updated but due to our limited access that may become a problem.
I do have unlimited access to her main website and will be able to post updates on her condition there, if this blog becomes unavailable to us. Please check both places for information.
For people with outstanding orders please contact me at steve@starnetservices.com and I will do the best I can to help you...
Steve Watkins
Monday, February 21, 2011

Sunday, February 13, 2011
Kreinik is Wired!!
 I've been plodding along on this conical topiary for several weeks - just trying to get enough background done to play a bit and see what I could work out for special effects in surface embellishment. The Kreinik metallics have been wonderful, as usual, (I will explain this on the other blog), and just at the best possible moment, I received in the mail a few spools of it to try.
It's very much like the DMC Memory Thread, but is the metallic we all love from this company. This is one of my most favorite colors - and in the #16 braid, which is all that's produced in the Hot Wire series.
played with making shapes, and worked this out on a pair of fat knitting needles. (for smoothness and symmetry)
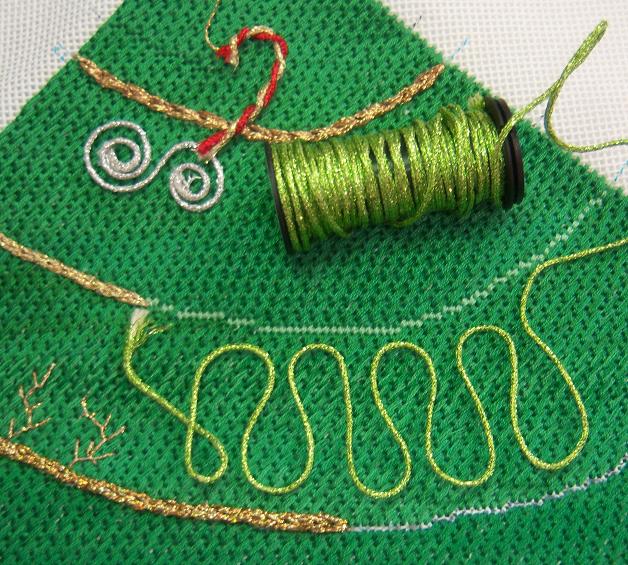 The method of handling is the same as for the DMC Memory Thread, which I have covered for needlepoint under the label "DMC" on the other blog. I can see a lot of possibilities for this loopy "fret," as it reminds me of the "cloud filling" I did from Sharon B's (Pintangle) stitch challenge last year.
This is also seen under DMC on my labels list on the other blog. It will require some manual manipulation to get it right on that curve, which will appear horizontal when the tree is upright.
A few weeks ago, I saw an ornament with a cording made with DMC Memory Thread, so I decided to see if I could twist the Kreinik. Due to it's nature, it isn't easy unless you have a little device for doing it (I don't) - so you need to cut short lengths, hold it tightly at both ends, and twist. Fun little tiny candy canes! 

While looking at these, think also of the posts I did a few weeks ago on the plain and simple triangular trees - they would be great to play with in this manner!! I'll show the conical topiary sometime tomorrow with updates!
Thursday, February 3, 2011
More Free Small Motifs for Valentines
 Emma Broidery, on her DMC blog, has some really fine small things for downloading and print out. These, of course, will do equally well for counted X-stitch or for needlepoint. On 18 mesh needlepoint canvas, the largest will only be a little over 1" wide - Some great ideas are already popping into my head, such as repeating one or two of them to make ribbons or borders.
You can go to the side bar on the right side of this blog called "Good Stuff," and click on the "Emma Broidery Blog" button to see all of them.
I'm thinking about asking Emma's permission to stitch a few and show some variations, etc. It's great to get the creative juices flowing!!
Tuesday, February 1, 2011
Free "Small Patterns" from Liz Morrow!!
 Liz Morrow (Lizart) is celebrating the first year anniversary of her web page, where she has delightful patterns to sell, by offering a new free pattern called "Small Things."
These are delightful tiny patterns that could be inserted into bigger ones, or they might be used as a central motif for building something a bit larger around them. Remember that charts work as well for both needlepoint and counted cross stitch.
You can download this and print it out - just click on the "free design" button to see it. The web page is HERE.
Monday, January 17, 2011
Shells for Ornaments
 I found two more pictures of sea shells - these were for a friend who wanted to decorate a small tree for her studio (a finisher).
They are relatively small, at just 4 3/4" high for the blue shell, and 5" high for the yellow one before adding the outline for finishing. Of course you could enlarge either of them, and even put them on larger mesh canvas for a pillow or purse inset.

I may decide I need to stitch this blue one for myself, as I see Petite Very Velvet for the blue areas - or could even use a different color. Then the Kreinik #12 braid in 002V or the Vintage silver (can't remember the name of it right now, and my color card is in a drawer across the room).
The "nacre" finish of the pink/orange lip needs to be done in DMC Satin Floss, and the pearls are bump stitches with Renaissance Shimmer or Rainbow Gallery Flair.

I didn't add jewels to the yellow one, as I like the markings and the "shine" on it better.

I hope you enjoy these and can use them for yourselves and as gifts. There are lots of tutorials on this blog and on Possibilities, etc. to guide you in canvas prepraration if you haven't seen them. I'm still working on the trees, as I can see them as table settings through all seasons - or on the mantel.
Thursday, January 13, 2011
More Patterns for Sea Shells
 I actually found the file folder with my sea shells in it, so will present them here for your use and enjoyment. There are plenty of tutorials and instructions on this blog, here and there, to get you started drawing and painting on canvas. The outlines, of course, could also be used for other things, both needlework and other painting related crafts.
The outlines are the shapes of actual shells, (in the range of 5 1/2" high) but I had a lot of fun painting them in exotic colors instead of the realistic ones. You could always consult a shell dictionary for that if you would rather do the "real thing."


I can see the potential here for some really pretty threads, such as the DMC Satin Floss in the "pearl" interior of the shell.


Please excuse the tilted drawing - it's late, and I was too tired (lazy) to remove the thing from the scanner and straighten it out. I hope you enjoy these, as I have several more I want to show in the next day or two.
Tuesday, January 11, 2011
Wonderful Color Schemes!
 For any who didn't see my post a few weeks ago on Possibilities, be sure to visit this site of Kristina's and watch her develop color schemes from her beautiful photographs.
I especially like the way she shows these swatches with the colors in proportion to how they show in the pictures.
As this is a "freebies" blog, you are usually in the position of selecting your own colors, so this would be a great aid in doing so when dumping out the stash to pull out what you want to use for a project. Besides, it's interesting to see what she has added each Monday.
Go to Kristina Klarin's blog to see!! Be sure to click on "colour files" on the left side panel to see the swatches without the pictures. (in storage)
Tuesday, January 4, 2011
Patterns for Sea Shells!
 Digging in boxes again, I have found some small canvases and drawings I had forgotten about - my sea shell collection from several years ago. I will also post the pictures of the painted ones if I can find the files.
I have loved seashells my entire life - from the time I saw the first one when I was about three years old. I used to paint them on needlepoint canvas their true and original colors, but a few years ago, after seeing some jewelry, I decided to use "Caribbean colors" and add pearls, etc.
The first picture is actually a green tree snail, but I took liberties with it. I found a treasure of pictures in a gorgeous encyclopedia of shells, plus a few other books on the subject. Marine biology is of great interest to me, so I've really enjoyed these books. (It's nice to be able to justify expenditures).

The second picture has only been partially painted, and the jewels added - I hope I have a photo of this one in color. It's about 5 1/2" high.
The next two are the drawings on canvas, ready to paint, with the little "pearls" drawn also. The long, skinny one is 5 3/4" high. The shorter one is 5 1/4" high. 


These are all that I have on canvas with the pearls, but there are more that are drawings of the actual shapes but without jewels. Also I found lots of just drawings on paper that I'll pass along in thenext post (while I'm still working on trees).
All of these shell shapes are drawn from pictures of the actual shells, so you might paint them realistically (leaving off the jewels) or do them in your choice of colors and do the pearls too.
Tuesday, December 28, 2010
More Festive Topiaries!!
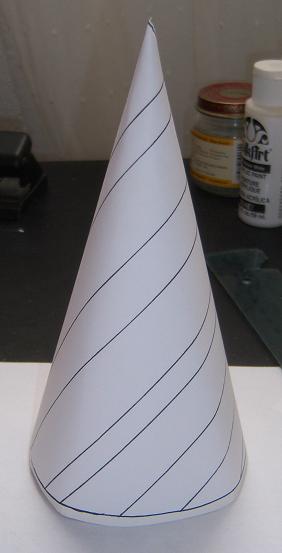 At this point, the project is beginning to be exciting, as new "happy accidents" occur. I have the flat paper sketches and the cone appearance of these on the other blog, but wanted to show what I discovered late last night!
By moving the orientation of this tree on canvas, I can use either my diagonal laces and trims or the horizontal laces and jeweled chains, etc. to make the spiral around the topiary.
The first photo shows the paper cone I drew with the lines parallel to the straight lines of the pattern. Incredible, I think, how it looks like spirals - which gave me lots and lots of new ideas!

By putting the top of the tree this way on the canvas, the lines are at 45 degree angles, so will accomodate easily my diagonal laces and "jeweled" chains, etc.
By turning it so that the straight sides are on the threads of the canvas (it also takes less canvas this way), I can do the horizontal/vertical laces and trims - and some of my RIBBONS!! also candy canes. Strings of candy corn, etc. - lots and lots of things for decorating a table top for a special occassion.


(No matter which way the pattern is oriented on the canvas, it will still finish as spirals.)
The second picture shows an old project with my "cotton lace," which is a horizontal lace.

The leaves are on one of my very first pieces in crazy quilt long ago, where I worked out leaves as a seam treatment - they are worked on the horizontal or vertical, and are great with French knot "berries."
At this point, I'm just wishing I could stitch as rapidly as I think. However, there are days that I can't think at all, so am grateful for small, mindless pieces to stitch to keep me going.
Sunday, December 26, 2010
The Topiary Tree! (in needlepoint)
 I have myself rather twisted and confused right now about what to put on which blog - but this is where the pattern should be, I think, and the actual stitching on the other one.. Anyway - this is how I went about arriving at it for now.
These drawing implements are very old, but I'm very attached to them - so please excuse their appearance. I used the triangle to make the 90 degree angle necessary for the top of the tree, and drew lines down each side with my black felt tip pen. This one is 7" tall.
 I decided to make the foliage/background shaded by needle blending, so needed to mark off the five spaces required to use two shades of a color. I divided 7 by 5, and then made concentric marks with the compass for the pattern.

Next, I marked the exact center of the conical pattern, and made black marks on the side so that I can make sure they are in the same place on both sides on the canvas - things need to meet when the cone is closed to make the tree.


I was playing a bit with the white paper cone while it was on the stiff poster board model, and then opened it out - surprising how these things look! It's difficult to envision those curved lines becoming straight bands on the tree.
I decided to add three to the canvas I'm going to stitch, as I want to make swags or something there. Notice how the straight vertical lines look when the paper is opened out. The rest of the story for today is over on Possibilities, etc. - including a bit of the stitching.

This next scan is the pattern itself - I have sized it to about 7", but you can always print it out and make it smaller or larger.
 This is the drawing on canvas, and the arrows are pointing to show that the lines end on each side on the same thread - a fingernail may be run across the canvas to make sure they are where they need to be. I marked the needle blending lines in black, and the three horizontal decorative bands in blue. I didn't feel it necessary to stitch count these curved lines on this, but care must be taken to make them neat.
NOTE: The stitching, which I began last night and showed on the other blog, has a serious glitch in it. Therefore, better judgment ruling in the morning light has shown me that I needn't do the five section separation for needle blending, but should simply use the four sections made by the "swag" lines, which are shown in blue on this pattern. I would not do the five separations unless I were going to do basketweave on the background. As it's already drawn onto the canvas, and I have begun stitching, I will simply ignore the black concentric lines, and just use the blue ones as separation.
The bottom is stitch counted so that it will sit nicely and not wobble or be lopsided when finished. There is a little mark showing the center thread at the bottom. I'm showing this sideways because it wouldn't fit in my scanner with the top upright - the bottom is too wide.
This pattern must be drawn with the point at the top. It requires more canvas, but won't stitch well at all if placed as I did the original one with the holly leaves. It's very easy to draw the 90 degree angle by just finding the center thread on the canvas, and making dots 7 inches down on each side from the top point. The concentric curves may just be traced very carefully by putting the canvas over the pattern you made.
Monday, December 20, 2010
A New Project: Topiary Trees in Needlepoint!
 I found an old photo in the bottom of a box, dated 1998! I had painted these things, conical topiary trees, for the cash/carry market in Phoenix in 1997 - and then discontinued them after about two years. (I do this when I'm tired of painting something.)
Anyway, I decided it would be fun to resurrect them and stitch a few for myself - and make a tutorial on how to do your own! I have learned and developed so many skills, stitches, and techniques, and become acquainted with zillions of fine novelty threads over this span of years, so think it would really be fun - and not just for Christmas!
I will show some stitching on Possibilities, where I have just now posted a tutorial on how to make a pattern - but will do the canvas preparation in detail here on this blog - so stay tuned in to both if the project interests you - it might be fun!
Wednesday, December 1, 2010
A New Month already!! (again)
 I cannot believe another month has gone, and I have produced so little for this blog - another very stressful change of address was in the middle of this one, but as soon as I find my drawing equipment and paint brushes, I'll be back working.
Anyway, this is "December" from my Birthday Crazy Quilt series - and probably my favorite besides April and August. It has lots of symbolism in the mistletoe, holly, narcissus, and the birthstone turquoise. (Tanzanite or blue zircon is the alternative used now, I think). I also like the effect of the blue patch with "rain drops," and the white with glittery snow.
I started these almost three years ago, but still haven't produced January, February, or July. Incidentally, these are now available as e-patterns on my web page, Elegant Whimsies, so you can put your own onto canvas.
Friday, November 5, 2010
Drawing Trees to Enhance and Embellish
 This is a project that I have played with many times over the years I've stitched and designed needlepoint. It's a very very simple thing that anyone could do - skill at art and drawing isn't necessary, and with a knowledge of lots of fun decorative stitches, amazing affects can be achieved.
One of my favorites a few years ago was a little grouping of three to five trees of different sizes, heights, and widths to sit on the mantel at Christmas time. I had little stands made with a base and a dowel to fit into a pocket on the back of the tree so that they would stand upright. I wish I had one to show, but I gave them all away.
Anyway - all you have to do is decide how tall you want your tree, and approximately how wide - so the tree will be tall and skinny or short and fat or whatever.
I first drew a straight line across the bottom, and then, using the triangle, drew a vertical line to designate the center. It's marked at 7 1/2" high.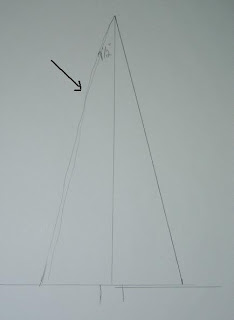
In the second picture, the arrow points to the left side, which is a sketch to show me the shape my tree will be. Then, the bottom is marked at 2" each side of the center, and a straight line is drawn from top to bottom on the right side, using the triangle as a straight edge. (because it was convenient). I added the little trunk freehand.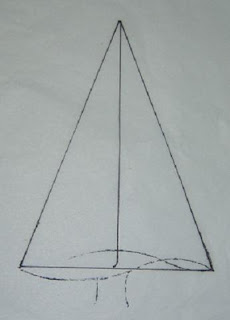

The next picture is the 5 1/2" tree I drew, using the same center line and base line, but cutting the center off at 5 1/2" high, - and drawing the line down to the 2" on each side, just as I did for the taller one.
At the bottom, you can see where I played with sketches for changing the shape, and then traced them onto tracing paper to use for my trees if I wish.

Drawing the tree onto the canvas is a simple thing - and you may use whatever mesh size you please for this project. Just place the canvas over the drawing with the center line exactly on a canvas thread so it will be symmetric.
The easiest way, if you aren't a perfectionist, is to use a straight edge and draw the line from top to bottom on each side. I've given several tutorials on this blog about drawing with a pen on canvas - a simple thing.
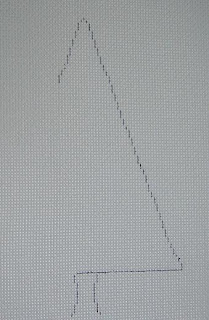 On this picture, I've begun to stitch draw the side, as I insist on symmetry. You can see where I started to copy on the left side what I've done on the right. I keep a little bottle of white acrylic paint on my table, and a trolley needle to dot out mistakes and re-draw them.
These little trees make a great small, bright project that one can do quickly, and they are a wonderful way to use up stash threads and practice stitches and new techniques and effects. You might just make horizontal bands of decorative stitches (I've actually seen these sold as painted canvas with stitch guides), or fill the whole tree with a multi-colored stitch.
I hope to find time to get a few ready to embellish with surface treatments and embroidered effects I've been wanting to try out! If you wish, just print out these drawings for yourself, and then enlarge or reduce them as you want them - an easy thing. I do recommend a coat of acrylic paint if you intend to use stitches that might allow the white canvas to show through - the "dandruff" effect.
Monday, November 1, 2010
Beads for Sugar Sprinkles! (decorating a cookie)
 Be sure to check Possibilities, Etc. fairly often, as the decorating continues on the Shamrock cookies. At the present time, the sugar sprinkle icing (made with beads worked "solid") is showing!
Also, for right now, the Beads! E-Booklet is offered at half price!!
Sunday, October 31, 2010
November in a Few Hours!!
 This year has flown fast, and it will be November in a few hours when I wake up! This is the November Birthday Crazy Quilt heart. Now I need to get busy and finish "January," as I put it down two years ago and never got it back out to do the silk ribbon carnations. Ouch.
Be sure to go see Possibilities, Etc., as I have started another cookie with "icing" - this time solid sugar sprinkles in the form of clear beads!
Friday, October 29, 2010
Stitching the Shamrocks
 I have started the stitching on the Shamrock cookies on Possibilities, etc., so you can take a look and follow along if you wish - and do something creative and original of your own!! Experiment!
Also, I'm offering for the duration of the cookies, my E-booklet (at half price) with lots of different cookie cutter shapes that I have used for many years for playing with new threads, stitches, and techniques - and have also added a mini-stocking. Lots of stitches diagrammed, and color pictures as guidance and inspiration.
Wednesday, October 27, 2010
Cookie Cutter Needlepoint
 That title could have double meaning - and I had to remind myself of just that when I was fooling around with the drawing. I had to remember that these are to be "cookies" shaped like Shamrocks, and that I probably would only have one cutter in the drawer. Decorating them is the fun and imaginative part that will make each one different.
Anyway - I started this odyssey on the other blog (Possibilities, Etc.), so you can go there to see what's happening. This pattern is about 4 1/4" across at the widest part, but you could always play around with the size and suit yourself. I used 18 mesh canvas, but 13 would work as well.
The idea is to replicate icing and do such things as you would do with a pastry tube/cake decorator type thing, using lots of fun things and great stitches. It's really a good way to try out new stitches too, and new fibers in your stash. I'm showing the drawing on canvas to illustrate the orientation of the tracing. Use the orange line as a reference.
 I'm showing the drawing on canvas to illustrate the orientation of the tracing. Use the orange line as a reference.
Please refer to other posts about canvas preparation and drawing for instructions for doing this. I've pointed to places where one must be sure to draw on the THREAD and not slip down between them into the groove - makes it much easier to stitch.
Friday, October 8, 2010
October Again Already!!
 The "Birthday Crazy Quilt Heart" for October was finished in 2008, with its opals and calendulas and glorious Fall colors. You can see the other months (some not done yet, though) on the other blog under the label Birthday Crazy Quilts.
There are lots of freebies on this site from last year for Halloween, so don't miss the napkin rings and other small, fun things.
I've never designed a lot of needlepoint for Halloween, as there seems to already be more than enough "out there," and it's also not really my interest for designing painted canvas or for stitching - I leave that to others who excel.
However, I have recently found a web site while cruising on ebay, that has just about sent me over the edge to be stitching on Halloween things!. These pieces are so much fun and so full of originality and personality, they are quite different from any I've seen. I've shown these on the other blog, but to be sure you don't miss it, I'll give you a link here for her Halloween page: Nenah's Needlepoint.
I won't show any canvases here, as that would spoil the surprise. Also, these aren't Freebies, of course, but the prices are so much less than they would be if offered in a retail store!! I love finding these wonderful things that I didn't know were available.
Sunday, September 5, 2010
More for a Halloween Table!
 Last year I drew several Halloween napkin rings, but didn't stitch any of them myself - these you can find under the label "napkin rings." There were two I didn't finish drawing, but now have at least put enough on canvas to be able to do a complete one of each, and also pass them along for you to do your own.
The first is a simple one - a bat! I picture a black one stitched in basketweave with Petite Very Velvet, and glittering metallic eyes (Kreinik braid). Usually I make these 1 1/2" wide, which is the same width used for bracelets and belts - but this one, to accomodate the "moon," is 1 3/4" wide.
I have left the images for these a bit large so that when you print them out, you can clearly see where to put the dots onto your canvas when you draw them. Where I put the arrow, just ignore the long, curved line - I drew these things late one night when I was too tired to count, and kept making a mess of it - so gave up and called this a "scrap" and just left the line there. Again - IGNORE it.
As for stitching the bat, I visualize a moon against a navy sky - maybe with metallic stars on it - either silver or Kreinik 032 white, which is very sparkly.

The next is a witch on her broomstick - again, against a moon! My son said this is a self portrait I painted. I put a red scarf on it simply to separate the dotted elements of the drawing.
You could put color on this lady, or just make her a black silhouette - whatever suits you!! Just have fun, and enjoy these for table settings - very festive!
As for drawing them onto canvas, there are a number of blot posts here to instruct you - mostly under "canvas preparation."
Wednesday, September 1, 2010
'Tis the Season! (thinking about stitching)
 Lest you think I've lost my mind (I probably have, and don't know it yet) - I decided I'm tired of looking at crazy quilts, so "retired" the September heart as a header, as I've used it two years in a row. (See these at my other blog, Possibilities, etc., under "Birthday Crazy Quilts")
I finished this piece last night as a napkin ring, as one of my "tartan adaptability and uses" experiments, and thought it might be suitable to point out that even tho' it's still horrendously hot (at least here in Austin), it's time to think about starting gifts, ornaments, table decorations, etc. for the upcoming gaiety of the seasons of fall into Christmas! (and don't forget Hanukkah!)
My next blog post here will be a new napkin ring motif or two, as these were fun last year, fast to stitch, and great for decorating a table. I'll probably change the header too, and show candy corn or something more appropriate! Meanwhile, there are lots of napkin ring patterns right here on this blog - just click on the label for them.
The illustrated napkin ring is adapted from the Alpine Meadlows tartan, and I have a more complete description on the other blog.
Subscribe to:
Posts (Atom)