Saturday, May 8, 2010

Using DMC Memory Thread: a Tutorial

When first working with a new thread that isn't familiar to me, I like to experiment and find something a bit out of the ordinary, unexpected, but within the limitations and character.

Almost immediately, when I saw the DMC Memory Thread, I saw CORAL! It reminded me of a pink sea fan on my screen saver! This prompted a series of "Coral Reef" ornaments, that are featured in the new issue of Needlepoint Now in my article.

That was a lot of fun, and after seeing it "in print and in person," I was prompted to start another one, and realized how much I had learned about handling the Memory Thread and making stitches with it - trial and error.

This is one of the "water droplets" - and I'll be showing it as it progresses on the other otther blog. Anyway, the method is this: With NAIL CLIPPERS (I never use scissors for cutting needlepoint threads, as the clipper is so much easier, more efficient, and produces cleaner ends) clip off a piece about 12" - 14" long. I like to rub it back and forth a few times gently on a rounded table edge to remove any bends or kinks.

To begin, decide where the first stitch will be placed - I make a sketch of a general idea before beginning. Using a #18 tapestry needle, make a hole from front to back, (for placement) - kind of jiggle it around a bit so that the Memory Thread will go right through it. Poke the M.T. through it about an inch, and bend it down on the back. Then complete the Fly Stitch.

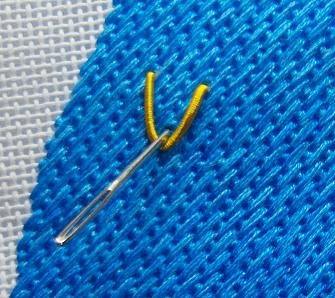
You'll be poking the M.T. through from back to front in "step 3" (the tail) of this stitch, so to identify where on the back to come back up, stick the needle through from front to back, and with the needle still in place, turn it over and see where to come back up with the M.T. (the first photo)

At this point, if the end is bent or frayed a little bit, simply clip off the very end to smooth it out and make it easy to push through the hole.

A mistake I made when I first started doing this was to neglect to poke the needle through from back to front, and eliminating this step made it very difficult to make the thread go through from back to front. I finally figured out that going from front to back was easy for a REASON. DUH! It's a good idea to keep a pair of tweezers close by for pulling the M.T. through if necessary - fingernails also work in a pinch.

Anyway, here I'm making fly stitches to create coral. The third photo is showing the "coral" almost finished.

The picture that inspired this one had some coral/peach color on it in this shape - so in addition to the yellow (#6170) I used a bit of #6060 to make the second part of each branch. Simple to do. I just made a stitch coming up from the back, sliding under the tail of the yellow stitch, and back down from front to back.

Last, the little polyps! I found a skein of DMC variegated Pearl Cotton that was the perfect color, weight, and texture for making French Knots here.
I won't pretend that this was easy, or that it didn't get a little tedious, but it's really well worth the effort - many of the threads we love affect us this way, but we use them because they produce the desired look, color and texture of our creations. If everything were easy, there would be no challenge to our creativity!!


Sunday, May 2, 2010

A Tartan Tutorial

First an explanation of the header. Again I have not designed and stitched the Birthday Crazy Quilt heart for May - haven't had time, but maybe next year. If I start now, I can probably at least get "July" worked. For now, the roses are blooming beautifully in the yard, so I opted for June for the header for the next two months at least.

Next, I have begun a tutorial on setting up plaid ribbons (we in this country call tartans "plaid.") This will be on the other blog, from time to time - so tune in there if it's of interest to you. I'll do more traceable DIY type things here on Freebies.
This is showing the "set-up" I devised yesterday for stitching the Millenium Ribbon from Scotland.

Wednesday, April 21, 2010

Stitching the Scallop Shell and Fish


Be sure to see the jeweled fish and the scallop shell on the other blog (Possibilities, etc.) with stitching in progress, as they're coming alive now with color!

Tuesday, April 13, 2010

Another Scallop Shell

This shell is rather small - perfect for an ornament for a small tree, maybe at one's beach house (or in my case wishful imagining of being back in Tallahassee).

Anyway, I'm planning to stitch some of these and show progress on the other blog after I determine which threads to use. At the moment, I'm looking at one of my favorite combinations: RG Petite Very Velvet, Kreinik metallic braid (#12 for the 18 mesh canvas) and Renaissance Shimmer to make "pearls" and "coral."

Originally, I painted these little ones for a friend here in Austin, who wanted to do a small "nautical theme" tree, so this is only 3 1/4" high as is - but could easily be enlarged by either enlarging the tracing or by using the counted canvas version on larger than 18 mesh canvas.


This, again, is a tracing of an actual scallop shell from one of my books on the subject. It's easy to imagine and place "jewels" on them and change to colors to suit! Of course, many times, the actual colors are gorgeous.
The drawing on canvas is symmetric and counted, as this is a must for a small piece, especially. Also, this could be done in counted cross stitch by simply substituting the dots on canvas with an X on graph paper or fabric. Quite simple. Play with this one and see what color combinations you might devise!

Sunday, April 11, 2010

Designing a Jeweled Fish (in Needlepoint or X-Stitch)

While looking at the painted canvas, I realized that this could also be done in counted cross-stitch on a colored fabric! The model is on 18 mesh canvas, so each little dot/stitch can be reproduced with a X-stitch on the fabric - on graph paper, this would appear as one square, so you might want to chart it that way first.
Anyway - this is a fish I traced from a book on tropical fish (can't remember the name of it right now), and then played with it a bit on doodle canvas to get an idea for embellishment - and voila! "jewels"!!

The jewels are on a 90 degree angle, which follows lines I drew first to get some ideas - and it worked! The jewels are in a setting of Kreinik metallic braid - #12 both in 002 gold and in silver for the little smyrna cross "beads." These are marked in blue on the canvas to easily distinguish from the gold settings.

To do your own, you might just follow what I did - or trace the outline of the fish (or find yourself a new one in a book or on the internet) and figure a wonderful and original pattern.
I'm planning to stitch several of these, as well as some shells I drew a number of years ago, on the other blog soon. On this fish, I'm seeing petite Very Velvet (Rainbow Gallery) with my favorite effect of the 002V metallic braid and lots of sparkle in the jewels. Also some DMC Satin Floss here and there for a great contrast in texture. I'll have some more shell freebies soon - I've been awfully busy lately, so am running behind.
ADDENDUM: For right now, I have the comments cut totally off, as a few nights ago, I had a horrendous spamming episode - and the only way I could stop it was to block and remove the entire comment section. I did this on the other blog also to take no chances. After this, I'll do the comment moderation thing, which I really didn't want to do. Oh well.

Tuesday, April 6, 2010

Sea Shells for Needlepoint: With or Without Jewels

I promised a while back that I would provide some patterns for sea shells for putting onto canvas yourself.

I finally dug out two rather fat files labeled "Jeweled Critters" and "Small Sea Shells." I had forgotten about many of them, as that binge of designing for me came and went about 12 years ago. Since then, I have found many many new threads to use to really enhance these things, and make them much better than they were the first time.

The first picture is a simple scallop shell - the first one I did when I departed from painting realistic sea shells on needlepoint canvas. I had pulled out a lot of threads in what I call "Caribbean Colors," and it seemed only right to paint some shells in these colors - but what was lacking, was "pearls."

The second picture is in the actual colors of a scallop shell which is native, as I remember, to somewhere in the south Pacific. Later, I added pearls to it, and painted it in several different color combinations - my favorite, of course, the aquas and green.

Enough of that. My purpose here is to inspire you to create your own, and it's actually quite simple. I have had a love and fascination for sea shells since I saw my first real ones as a small child at Ft. Pierce in Florida, during WWII, just before my father went off to the south Pacific.

When I moved to Tallahassee in my early 40's, my favorite recreation was going to the beach "in season" and picking up shells, and going out onto the sand bars to pick up sand dollars with my toes. Of course I then had to put them onto canvas for stitching.

All of my fantasy "jeweled" shells are from actual shapes, most of which I traced from several wonderful books of shells I own - one of them is a gigantic "coffee table" book. (I'm back in Austin now)

You can do this - or look for shells on the internet. Mine are here for you, and my suggestion is that you print them out, size them as you wish, and draw them onto canvas. Then see what you can do with adding jewels and beautiful, unusual colors.

This shell is a green tree snail - it was in my giant book of shells, so I traced it and added the pearls. I'm already pulling out threads to see what I can use to really make it special. Maybe Petite Very Velvet with the pearly coral colored area in DMC Satin Floss. The gold outlining will, of course, be Kreinik 002V #12 braid, as this is on 18 mesh canvas.

This is not the color of the actual green tree snail, as the real ones are very very bright green - gorgeous things!! I"m giving you both the tracing, and also the scan of the actual canvas, marked for the addition of the "pearls."

As I don't like to paint the canvases I'm going to stitch unless I have to, I'll just mark the areas of color with the Sharpie ultra fine permanent drawing pen, so I'll know where to stitch each color. Thank heaven for colored drawing pens these days!!


To show the transition from sea shell book to painted canvas, I've photographed the two pictures together to give you an idea of what you can do. This is a "banded tulip" - one of my favorites.

Thursday, April 1, 2010

It's April Already - my Favorite Month!!

Diamonds and Sweet Peas - with a bit of rain. What more could one want, except hoping hot weather will delay another month or so.

I didn't finish this "Birthday Crazy Quilt" until June of last year, so it wasn't available for a Freebies header.