 When first working with a new thread that isn't familiar to me, I like to experiment and find something a bit out of the ordinary, unexpected, but within the limitations and character.
 Almost immediately, when I saw the DMC Memory Thread, I saw CORAL! It reminded me of a pink sea fan on my screen saver! This prompted a series of "Coral Reef" ornaments, that are featured in the new issue of Needlepoint Now in my article.
That was a lot of fun, and after seeing it "in print and in person," I was prompted to start another one, and realized how much I had learned about handling the Memory Thread and making stitches with it - trial and error.
This is one of the "water droplets" - and I'll be showing it as it progresses on the other otther blog. Anyway, the method is this: With NAIL CLIPPERS (I never use scissors for cutting needlepoint threads, as the clipper is so much easier, more efficient, and produces cleaner ends) clip off a piece about 12" - 14" long. I like to rub it back and forth a few times gently on a rounded table edge to remove any bends or kinks.
To begin, decide where the first stitch will be placed - I make a sketch of a general idea before beginning. Using a #18 tapestry needle, make a hole from front to back, (for placement) - kind of jiggle it around a bit so that the Memory Thread will go right through it. Poke the M.T. through it about an inch, and bend it down on the back. Then complete the Fly Stitch.
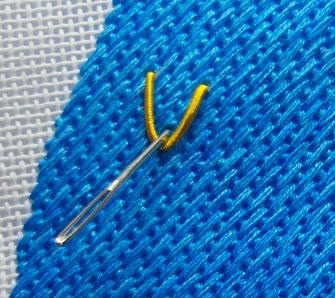
You'll be poking the M.T. through from back to front in "step 3" (the tail) of this stitch, so to identify where on the back to come back up, stick the needle through from front to back, and with the needle still in place, turn it over and see where to come back up with the M.T. (the first photo)
At this point, if the end is bent or frayed a little bit, simply clip off the very end to smooth it out and make it easy to push through the hole.

A mistake I made when I first started doing this was to neglect to poke the needle through from back to front, and eliminating this step made it very difficult to make the thread go through from back to front. I finally figured out that going from front to back was easy for a REASON. DUH! It's a good idea to keep a pair of tweezers close by for pulling the M.T. through if necessary - fingernails also work in a pinch.
Anyway, here I'm making fly stitches to create coral. The third photo is showing the "coral" almost finished.
 The third photo is showing the "coral" almost finished.
 The picture that inspired this one had some coral/peach color on it in this shape - so in addition to the yellow (#6170) I used a bit of #6060 to make the second part of each branch. Simple to do. I just made a stitch coming up from the back, sliding under the tail of the yellow stitch, and back down from front to back.

Last, the little polyps! I found a skein of DMC variegated Pearl Cotton that was the perfect color, weight, and texture for making French Knots here.

I won't pretend that this was easy, or that it didn't get a little tedious, but it's really well worth the effort - many of the threads we love affect us this way, but we use them because they produce the desired look, color and texture of our creations. If everything were easy, there would be no challenge to our creativity!!


Love your mini tutorial on the "ins and outs" (no pun intended) of Memory Thread. Seeing your application gives way to many other ideas of where to use it. Will look for this next time I'm in LNS to see how many colors it comes in.
ReplyDeleteIt comes in a surprising number and range of colors - very interesting!
ReplyDelete