Wednesday, July 14, 2010

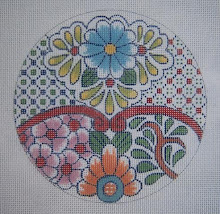
More "Paint Your Own Canvas": A Floral Cross

I found this photograph, as I have found so many long forgotten, while cleaning out boxes after a major move of residence. This one is a scan of a photograph, as I painted it long before I had a digital camera and computer - a VERY long time ago.

As I remember, I drew and painted this for a class I was teaching in trying out different techniques and canvas preparation. I think this is the one which led to my deciding to start using silk ribbon embroidery for flowers on crosses and then, later, crazy quilt adaptations.

Anyway, over the next week or so, I intend to give you here the instructions, starting with cutting the canvas, in detail for drawing it onto canvas yourself - and then suggestions for stitching.

There are plenty of tutorials on canvas preparation now here and on my other blog, Possibilities, etc., to help you know which pens and which paint to use, and how to use the paint brushes, etc. etc.

This is a more advanced Freebie, and I hope you put it to good use and enjoy it!! Just please remember that it's for your own entertainment and for giving as gifts either as a painted canvas for stitching friends or as a stitched and finished piece - but NOT for sale as a painted canvas.

For more detailed instructions for Painting Your Own Canvas, I have the book in two chapters now as an E-booklet on my web page, Elegant Whimsies. Under "our designs" just click on E-Books.

I think this has confused some people who have only seen the coil bound version. This is the downloadable, much less expensive version, as you receive it almost immediately upon purchase, and may download and print it out yourself. I revised it and added a lot more color, newer materials and techniques.

Friday, June 25, 2010

Stitching Gingham/Plaid/Tartan on a Circle (How to)

I used all three names applied to this textile - stripes intersecting at right angles to form a delightful pattern (I explained the origin of the terms in a previous post back a while.)

This one is what we in this country call "Gingham," a woven fabric (replicated in needlepoint here) with even stripes on both warp and weft - and just one color plus white, creating a lighter shade of the color where it crosses.

The arrow is pointing to a place where one has to be careful when stitching on a rounded outline. It's necessary to pay attention!!

Feeling rather lazy the day I needed to start this, instead of cutting a new square of canvas, I Ipicked up a small piece of canvas that already had a 3 3/4" circle drawn on it, and decided it would be a great exercise anyway in stitching needlepoint plaid.
The circle is drawn on an odd count, which meant I couldn't make stripes of 4 threads. Three were too small for the scale of this piece, and 7 were too wide.

There is a lot more to using plaid for needlepoint than just "setting it up." One has to consider the intended use for a particular project, and make sure the scale is also attractive. The 5 threads I settled on look right for the circle.

The next consideration was where to start. On a rectangle, I would have started stitching the warp on the right side - however, on this circle, I began in the center, as I am a perfectionist about symmetry. (The circle is stich drawn for this reason) From the center, I simply worked out toward the right side.

The arrow pointing to the center shows where one could draw a well centered letter or monogram if desired (before stitching). Next, I started stitching the weft - again centering it. The arrows point to the center thread.

After this, it had to be marked for guidance, so I used the Sharpie extra fine Permanent MARKER - never the paint pen, as it's not really safe for needlepoint canvas. I counted backward from the center to reach the top where I began the stitching. The marks on this circle didn't go into the circle itself as I do on squares - it would have made the outline difficult to discern.

The arrows point to a place that looks rather strange - but it's just the white stitches making the "gap." This won't show when it's finished.
The last picture shows the progress toward looking like gingham!! Again, the arrows point to places where it appears that a little bite has been take out of the circle. The tendency would be to want to complete the blue square - but then it wouldn't be correct according to the circle drawing. A round piece this small could be a box top insert - but I think I would have started with a monogram before beginning the stitching!

ADDENDUM: I have several tutorials on the subject of stitching plaid in needlepoint, but for anyone who has missed it; the WARP (vertical) stripes are stitched first, and in basketweave, on every other row. Use the warp threads of the canvas - the thread is on top, forming a slight "bump." Then the weft is worked horizontally on the weft threads of the canvas - where the spaces are left. This is extremely simple, and there is minimal distortion of the canvas.

Monday, June 7, 2010

Using the Tartans

As I have been doing a number of posts about Plaid and Tartans (one and the same in the U.K.) on both blogs, I feel I need to do a disclaimer and explanation of my use of the Registered Tartans. (I've shown the Texas Bluebonnet first on January 3 on Possibilities, etc. and again recently, and the Alpine Meadows, as well as the Millenium Ribbon.)
I have contacted the Scottish Registry, and am told that it is definitely a copyright infringement, and therefore illegal, to make charts of these to sell.

It is O.K., however, to use them as I have on these blog posts to demonstrate how to interpret and set up a tartan/plaid for one's own use. The same method applies to other plaids one sees and wants to convert to needlepoint. I used the Tartans simply because I have loved them for many years.

The Bluebonnet plaid has gorgeous colors - and is also the state flower of my home state, Texas. Green is my favorite color - hence the Alpine Meadows, shown in the picture for progress!

I have shown my little canvas doodles where I worked out the counts, and you are welcome to use those for your own enjoyment - but NOT to make charts and sell. I also have planned tutorials on how to USE these plaids to create actual projects - I've managed to lay out a checkbook cover with this green one, as the pattern elements fit. (These will probably be on Possibilities, etc.)

My daughter says she would like the Burberry tartan for hers. Of course she would. Later. I offered to make also a dog collar for my SIL's big yellow lab, Godzilla, but it was declined, as was a belt for SIL - however, many many people are making plaid belts!! I'll show this process also.

Anyway, the gist of this is that one may replicate a registered tartan for PERSONAL use, but not for commercial. That is to say, not for financial gain by selling charts and patterns.

I do have a book on creating and using Plaid, which also includes quite a number of plaids I've created myself - but these are totally original, and not registered tartans. The book is being revised (in my spare time) and updated, and will be offered as an e-book soon, I hope, on my web page.

Thursday, June 3, 2010

A Free "Create Your Own Tartan" Site!!


This is the Anderson tartan - officially registered (I like to show it, as it's my family tartan - a very old one, and the only one with 7 colors) I haven't tackled "adapting" it for my own use, as it's a bit complicated.

Anyway - If you haven't seen my other blog post about it, there is a really great and fun place to go to create a plaid/tartan of your own. It's as entertaining as the Jig-Zone puzzles I play with when taking a break. (creative avoidance).

You can see it at SCOTWEB. From the home page, just click on "tartans" and scroll down a bit - and you can go to the place to design your own.

Wednesday, June 2, 2010

"The Rule" once again!!

I honestly thought enough time had elapsed a while back that I could remove "The Rule" from my side bar. Apparently not so, as professional etiquette and blog etiquette has once again been abused.

My tutorials - how to's and patterns - are absolutely for your use and enjoyment - but they are NOT for using for your own purposes to put together and sell on the internet, represented as your own work. I have too many years of research and experience in developing these things to allow it. Besides- it isn't nice!

The last time this happened, I had to get my attorney involved to stop it, and was advised to take all the posts off so they could no longer be used. In this case, I have too much time involved, and still am wanting to share whatever I can of techniques and patterns with anyone who would enjoy them - but not for their own profit.

Tuesday, June 1, 2010

Tutorial for Tartan/Plaid

If you haven't seen it, and like stitching (or want to learn how) plaid, I have a tutorial on the other blog, Possibilities, etc. It's explaining how to adapt a tartan plaid to needlepoint - Fun!! I have a second one ready to post this morning.

Saturday, May 22, 2010

Needle Blended Shading: An Ornament Tutorial

I was looking through old picture files yesterday, hoping to find inspiration - and I did! I won't show the photo, as it's been so long, I don't remember who did the work. It's a block from an art crazy quilt that has four layers of shades of pink, embellished with embroidered seam treatments - which goes right along with what I'm doing these days in needlepoint.

As for the layers of shades of color, I decided it would be fine to do an ornament, but with needle blending, as Anne Stradal (The Cape Stitcher) taught me. She uses this technique for skies behind lighthouses and California missions. Charming!! I used it on my recent "Coral Reef" series to shade the sea water from light at the top to dark at the bottom of the ocean.

The first scan is one of the water droplets, where you can see the gradual shading from top to bottom. This is achieved (on 18 mesh canvas) by dividing the piece into equi-distant sections, using five if you're just using two shades of a color - which is quite enough!

Start on the first section with four plies of the lightest color. Then on the next one, three plies of the light, plus one of the dark. Next - two of each, then three of the dark and one light, and finish with four plies of the dark. Very easy! (using DMC cotton floss)

I worked on the red one first, but decided to make it larger for the pink one and use three shades of the pink. Be sure not to have the shades of color too far apart in value.

By using three shades, I had to use more divisions - and arrived at 8, so the little spaces are narrower. Also, I drew the ornament larger than the red one, which is from my collection of "traditional ornament shapes." (Available as E-Patterns on my web page.)

The ornament that is to be red is 4 1/8" wide. If you print this out, you may either just trace it onto canvas, or - better - go ahead and stitch draw it, following my drawing, as it's very easy - and much better to have it perfectly symmetric. On this one, I'm using Nobuko stitch for background.

The ornament that is to be shades of pink is 5" wide. By no means does it have to be divided into 8 segments for three shades - could also be worked beautifully with just the two shades on five segments. I had originally drawn these to do more of the Coral Reef things - using different shapes and salt water tropical fish. Will do that another time!!


ADDENDUM: It's Monday morning, and my mind seems to be coming back - I remembered where I saw the beautiful crazy quilt block which inspired the "layered" pink ornament! It was on the blog by Jo of New Zealand - No Matter Where I Go, I Always Meet Myself There - this is fun, informative, and very imaginative, as well as showing beautiful needlework.