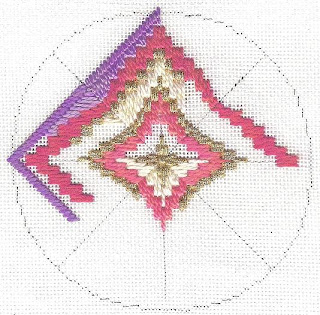
 That is a grand name for another 4-way bargello Christmas type ornament. I apparently did this one about five years ago, as it was at that strata in the box. I also found another scan of the first one, which was started in perle cotton. I have no idea where the ornament is, but you can see the stitching and the possibilities. It would be great to choose a Caron Watercolours and do a color scheme from it.
You can see on the canvas the marks still showing where the centers and diagonals were drawn. This should help you understand the construction if you don't already.
This piece is 4 3/4" from point to point on 18 mesh canvas. Threads used on this model were Rainbow Gallery Frosty Rays in white, green, and red - and a bit of red perle cotton just under the last red border. I have no idea what prompted me to do that, but I really like the difference in texture. I had not yet found the Kreinik ribbon when I did this one, so used the #16 braid in metallic gold for the uprigiht stitches. Now I would definitely use 1/16" ribbon. Anyway, to begin, mark the vertical and horizontal centers in the GROOVE, as you will be doing upright stitches - then draw the diagonals with dots out from the little 4 stitch square in the center. This little square is where you begin stitching with a smyrna cross.
 Anyway, to begin, mark the vertical and horizontal centers in the GROOVE, as you will be doing upright stitches - then draw the diagonals with dots out from the little 4 stitch square in the center. This little square is where you begin stitching with a smyrna cross.
On this red, green, and white one, in the center area, I used white Spendor silk and Sundance beads - the hexagonal #250, size 14. They really glitter! I did the basketweave thing on every other row on the warp, and then placed the beads in the spaces left in the weft - the instructions are here on this blog somewhere for the bead placement - if not, I'll add it later. It looks beaded solid. You can see on the scan of the pink and purple one that perle cotton was used in this area, as well as on the area just under the top pink border. The stitches, as always on these 4-way designs, change direction at the diagonals. The perle cotton is #3, as the stitches are upright.
Just follow the chart - it's really quite simple. It's best to do the color bargello borders BEFORE doing the white background - whether you are doing those also in bargello or using basketweave. The only explanation I have for the circle is that I started out just playing around with bargello, intending to make a round ornament - but this one evolved instead. It could still be made round by just doing a different format bargello and ending at the curved line.
Notice on the chart, and on the picture of the finished ornament that I made, outside the single line of gold stitches, another framework (for finishing) of three rows of basketweave - but going in different directions from top center to horizontal center. This totally eliminates the "sawtooth" effect, and makes a very neat edge.
Look in your stash and see what you have that might make this ornament - lots and lots of different color arrangements are possible!!


Hi Judy,
ReplyDeleteAnother beautiful ornament!
Thanks for sharing!!!
Cynthia
Windy Meadow