The new header is a part of my December "Crazy for Birthdays" heart ornament. The history and symbolism of the mistletoe, holly, and narcissus, as well as the turquoise are explained in posts on the other blog under "Birthday Crazy Quilts." The research on these was fascinating!!
Sunday, November 30, 2008
Saturday, November 29, 2008
A Mini-Plaid tutorial: Gingham Checks
When researching the origins of plaid several years ago, I was not surprised to learn that it originated, of course, in Scotland. I still visualize, however, in pre-history, some ladies weaving grass mats for their homes, and noticing that the different colors of grasses, when they crossed each other in warp and weft, created a definite pattern - and this probably led to further experimentation with plant dyes.
Plaid, in it's simplest form - the gingham checks - is one of the first woven fabrics I sought to replicate in needlepoint many years ago. It's just a matter of using a color plus white (in it's simplest form) and a symmetric count - that is, on this one, four threads blue and four white. Where they cross, a third value is produced. (When using two colors instead of the white, a third color is made.)
In the second picture, I used two colors plus white, and a different format. Same number of threads (4) but it looks entirely different from the simple gingham. This illustrates the many many possibilities for re-arrangeing thread counts and colors and creating an endless variety of plaids!
To begin a plaid, the canvas needs to be marked for ease in stitching - and the WARP must be stitched first, as needlepoint canvas is a woven fabric, and the warp of any fabric is the strongest element. I have seen people start stitching across - on the weft, but this is like doing continental stitch on mono canvas - it will warp badly.
You can see on the marked canvas that I have marked the four threads for color only - as this makes it easier to see where to insert the white. Just stitch in basketweave down as far as you want on the four threads vertically - using ONLY the "bumps" of the warp threads. Make the stripes of color and white BEFORE stitching the weft. (which also should be marked at the sides to avoid confusion).
I really enjoy using this to frame names and monograms - or quotes, and made a door hanger for my first grandson with "crayon" colors - full intensity! The white "background" was reduced to three threads only, and the color stripes are five.
Ihad an interesting development several years ago, as I decided one day I needed a very small scale plaid for a patch on a crazy quilt ornament - so I used two threads of each color - and to my surprise, houndstooth check appeared. Happy accident!!
Another happy accident happened when I was stitching the little pink and orange gingham heart, and was bored that day, - deciding to do the weft in beads in the same colors to see what would happen. To my amazement, it looked beaded solid!
There are many many uses for plaids - and I enjoy them so much, as starting to stitch on a bare white canvas is like painting with your needle - and as the plaid emerges, one wants to just keep on going to see what the next repeat is going to look like. It never gets boring. I have done a book on this, which goes into much more detail and shows many more uses for it - but meanwhile, this should give you some ideas to get started.
The next two charts will show the progress of stitches, beginning with the vertical stripes of the plaid worked on the warp threads - the "bumps" when the vertical threads are on top. Then the weft (where the horizontal threads are on top - the "dips") I used blue ink to show what would be white on the blue and white gingham.
The arrows point to the warp threads as they lie on top in the weave.
The second chart illustrates the plaid being formed as the weft is stitched horizontally. Notice where the green crosses the white (blue on this) that a second element of color is formed.
I hope you will use this and enjoy it - and create some new ones of your own. You'll find yourself closely examining clothing on people at the supermarket, and noticing the structure of plaids in upholstery materials - Fascinating!!
Monday, November 17, 2008
Another Lace Corner
Friday, November 14, 2008
Lace for All Seasons (in needlepoint)
I found this little black swatch as I was trying to make some order out of chaos today, and cleaning out drawers, etc. I made bracelets and earrings with this last year, and used lots of beads - but actually developed the lace thing back in the 70's, as with most of the things I'm doing now. These are soooo easy to do, as the little "bumps" are simply Smyrna cross. You can just draw where they go from the picture/canvas chart, and make lots and lots of different things!
You can see the other lace goodies and get some ideas on my other blog under "Needlepoint Lace." The black swatch looks, without the mirror image at the bottom, like a division between stocking and cuff for a mini-stocking. You might also make napkin rings, etc. with these - or, if you are now proficient with drawing circles and other ornament shapes onto canvas, these would decorate them well in bands going across the middle. I used, on the black piece, Kreinik metallic braid - including the little red flowers.
This mini-stocking also is an unfinished piece from long ago - probably about ten years ago when I got on a lace binge again. You can see where smyrna crosses go, and the larger "crochet popcorn" lace elements are Leviathan stitches.
The lace thing can go on and on when I get started doodling on needlepoint canvas with my drawing pen, as so many different arrangements can be made. Mostly, I use it for framing monograms, quotes, or names on pillows - marvelous effect! To make a small border, just draw the corner first, so that you can miter it when you get to the diagonal - for symmetry! This is where you can play around with it and get some interesting effects.
I like to use perle cotton or silk on the lace when using it this way so that it really resembles the crocheted Irish lace that inspired it - preferably white or ecru. I forgot to mention that the edging on the black swatch, which was intended for a bracelet, is long-armed cross stitch, which rolls over so nicely for the finishing. On any other use, you might use a row of smyrna crosses, or simply make stitches over 2 x 2 threads - a really nice effect.
If you find this project interesting - don't forget to go to the other blog and click on "Needlepoint Lace" to see lots more.
Sunday, November 2, 2008
A "Mitered Florentine" Ornament
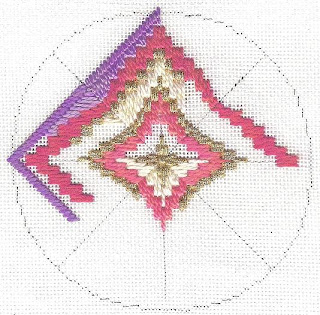
That is a grand name for another 4-way bargello Christmas type ornament. I apparently did this one about five years ago, as it was at that strata in the box. I also found another scan of the first one, which was started in perle cotton. I have no idea where the ornament is, but you can see the stitching and the possibilities. It would be great to choose a Caron Watercolours and do a color scheme from it.
You can see on the canvas the marks still showing where the centers and diagonals were drawn. This should help you understand the construction if you don't already.
This piece is 4 3/4" from point to point on 18 mesh canvas. Threads used on this model were Rainbow Gallery Frosty Rays in white, green, and red - and a bit of red perle cotton just under the last red border. I have no idea what prompted me to do that, but I really like the difference in texture. I had not yet found the Kreinik ribbon when I did this one, so used the #16 braid in metallic gold for the uprigiht stitches. Now I would definitely use 1/16" ribbon. Anyway, to begin, mark the vertical and horizontal centers in the GROOVE, as you will be doing upright stitches - then draw the diagonals with dots out from the little 4 stitch square in the center. This little square is where you begin stitching with a smyrna cross.
On this red, green, and white one, in the center area, I used white Spendor silk and Sundance beads - the hexagonal #250, size 14. They really glitter! I did the basketweave thing on every other row on the warp, and then placed the beads in the spaces left in the weft - the instructions are here on this blog somewhere for the bead placement - if not, I'll add it later. It looks beaded solid. You can see on the scan of the pink and purple one that perle cotton was used in this area, as well as on the area just under the top pink border. The stitches, as always on these 4-way designs, change direction at the diagonals. The perle cotton is #3, as the stitches are upright.
Just follow the chart - it's really quite simple. It's best to do the color bargello borders BEFORE doing the white background - whether you are doing those also in bargello or using basketweave. The only explanation I have for the circle is that I started out just playing around with bargello, intending to make a round ornament - but this one evolved instead. It could still be made round by just doing a different format bargello and ending at the curved line.
Notice on the chart, and on the picture of the finished ornament that I made, outside the single line of gold stitches, another framework (for finishing) of three rows of basketweave - but going in different directions from top center to horizontal center. This totally eliminates the "sawtooth" effect, and makes a very neat edge.
Look in your stash and see what you have that might make this ornament - lots and lots of different color arrangements are possible!!
Subscribe to:
Posts (Atom)