Showing posts with label seasonal. Show all posts

Tuesday, December 28, 2010

More Festive Topiaries!!

At this point, the project is beginning to be exciting, as new "happy accidents" occur. I have the flat paper sketches and the cone appearance of these on the other blog, but wanted to show what I discovered late last night!

By moving the orientation of this tree on canvas, I can use either my diagonal laces and trims or the horizontal laces and jeweled chains, etc. to make the spiral around the topiary.

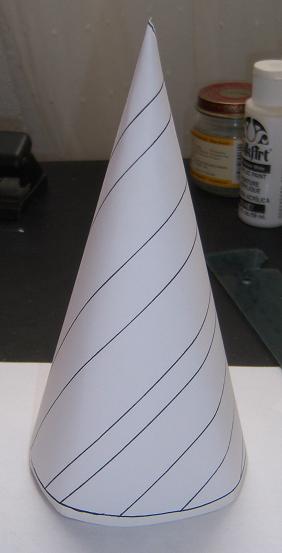
The first photo shows the paper cone I drew with the lines parallel to the straight lines of the pattern. Incredible, I think, how it looks like spirals - which gave me lots and lots of new ideas!

By putting the top of the tree this way on the canvas, the lines are at 45 degree angles, so will accomodate easily my diagonal laces and "jeweled" chains, etc.

By turning it so that the straight sides are on the threads of the canvas (it also takes less canvas this way), I can do the horizontal/vertical laces and trims - and some of my RIBBONS!! also candy canes. Strings of candy corn, etc. - lots and lots of things for decorating a table top for a special occassion.
(No matter which way the pattern is oriented on the canvas, it will still finish as spirals.)

The second picture shows an old project with my "cotton lace," which is a horizontal lace.

The leaves are on one of my very first pieces in crazy quilt long ago, where I worked out leaves as a seam treatment - they are worked on the horizontal or vertical, and are great with French knot "berries."

At this point, I'm just wishing I could stitch as rapidly as I think. However, there are days that I can't think at all, so am grateful for small, mindless pieces to stitch to keep me going.

Monday, December 20, 2010

A New Project: Topiary Trees in Needlepoint!

I found an old photo in the bottom of a box, dated 1998! I had painted these things, conical topiary trees, for the cash/carry market in Phoenix in 1997 - and then discontinued them after about two years. (I do this when I'm tired of painting something.)

Anyway, I decided it would be fun to resurrect them and stitch a few for myself - and make a tutorial on how to do your own! I have learned and developed so many skills, stitches, and techniques, and become acquainted with zillions of fine novelty threads over this span of years, so think it would really be fun - and not just for Christmas!

I will show some stitching on Possibilities, where I have just now posted a tutorial on how to make a pattern - but will do the canvas preparation in detail here on this blog - so stay tuned in to both if the project interests you - it might be fun!

Friday, November 5, 2010

Drawing Trees to Enhance and Embellish

This is a project that I have played with many times over the years I've stitched and designed needlepoint. It's a very very simple thing that anyone could do - skill at art and drawing isn't necessary, and with a knowledge of lots of fun decorative stitches, amazing affects can be achieved.

One of my favorites a few years ago was a little grouping of three to five trees of different sizes, heights, and widths to sit on the mantel at Christmas time. I had little stands made with a base and a dowel to fit into a pocket on the back of the tree so that they would stand upright. I wish I had one to show, but I gave them all away.

Anyway - all you have to do is decide how tall you want your tree, and approximately how wide - so the tree will be tall and skinny or short and fat or whatever.

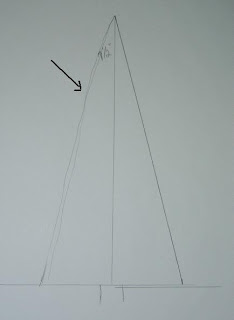
I first drew a straight line across the bottom, and then, using the triangle, drew a vertical line to designate the center. It's marked at 7 1/2" high.

In the second picture, the arrow points to the left side, which is a sketch to show me the shape my tree will be. Then, the bottom is marked at 2" each side of the center, and a straight line is drawn from top to bottom on the right side, using the triangle as a straight edge. (because it was convenient). I added the little trunk freehand.

The next picture is the 5 1/2" tree I drew, using the same center line and base line, but cutting the center off at 5 1/2" high, - and drawing the line down to the 2" on each side, just as I did for the taller one.

At the bottom, you can see where I played with sketches for changing the shape, and then traced them onto tracing paper to use for my trees if I wish.

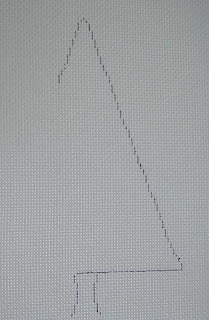
Drawing the tree onto the canvas is a simple thing - and you may use whatever mesh size you please for this project. Just place the canvas over the drawing with the center line exactly on a canvas thread so it will be symmetric.
The easiest way, if you aren't a perfectionist, is to use a straight edge and draw the line from top to bottom on each side. I've given several tutorials on this blog about drawing with a pen on canvas - a simple thing.
On this picture, I've begun to stitch draw the side, as I insist on symmetry. You can see where I started to copy on the left side what I've done on the right. I keep a little bottle of white acrylic paint on my table, and a trolley needle to dot out mistakes and re-draw them.
These little trees make a great small, bright project that one can do quickly, and they are a wonderful way to use up stash threads and practice stitches and new techniques and effects. You might just make horizontal bands of decorative stitches (I've actually seen these sold as painted canvas with stitch guides), or fill the whole tree with a multi-colored stitch.

I hope to find time to get a few ready to embellish with surface treatments and embroidered effects I've been wanting to try out! If you wish, just print out these drawings for yourself, and then enlarge or reduce them as you want them - an easy thing. I do recommend a coat of acrylic paint if you intend to use stitches that might allow the white canvas to show through - the "dandruff" effect.


Monday, November 1, 2010

Beads for Sugar Sprinkles! (decorating a cookie)

Be sure to check Possibilities, Etc. fairly often, as the decorating continues on the Shamrock cookies. At the present time, the sugar sprinkle icing (made with beads worked "solid") is showing!

Also, for right now, the Beads! E-Booklet is offered at half price!!

Sunday, October 31, 2010

November in a Few Hours!!

This year has flown fast, and it will be November in a few hours when I wake up! This is the November Birthday Crazy Quilt heart. Now I need to get busy and finish "January," as I put it down two years ago and never got it back out to do the silk ribbon carnations. Ouch.

Be sure to go see Possibilities, Etc., as I have started another cookie with "icing" - this time solid sugar sprinkles in the form of clear beads!

Friday, October 29, 2010

Stitching the Shamrocks

I have started the stitching on the Shamrock cookies on Possibilities, etc., so you can take a look and follow along if you wish - and do something creative and original of your own!! Experiment!

Also, I'm offering for the duration of the cookies, my E-booklet (at half price) with lots of different cookie cutter shapes that I have used for many years for playing with new threads, stitches, and techniques - and have also added a mini-stocking. Lots of stitches diagrammed, and color pictures as guidance and inspiration.

Wednesday, October 27, 2010

Cookie Cutter Needlepoint

That title could have double meaning - and I had to remind myself of just that when I was fooling around with the drawing. I had to remember that these are to be "cookies" shaped like Shamrocks, and that I probably would only have one cutter in the drawer. Decorating them is the fun and imaginative part that will make each one different.

Anyway - I started this odyssey on the other blog (Possibilities, Etc.), so you can go there to see what's happening. This pattern is about 4 1/4" across at the widest part, but you could always play around with the size and suit yourself. I used 18 mesh canvas, but 13 would work as well.

The idea is to replicate icing and do such things as you would do with a pastry tube/cake decorator type thing, using lots of fun things and great stitches. It's really a good way to try out new stitches too, and new fibers in your stash. I'm showing the drawing on canvas to illustrate the orientation of the tracing. Use the orange line as a reference.
Please refer to other posts about canvas preparation and drawing for instructions for doing this. I've pointed to places where one must be sure to draw on the THREAD and not slip down between them into the groove - makes it much easier to stitch.

Friday, October 8, 2010

October Again Already!!

The "Birthday Crazy Quilt Heart" for October was finished in 2008, with its opals and calendulas and glorious Fall colors. You can see the other months (some not done yet, though) on the other blog under the label Birthday Crazy Quilts.

There are lots of freebies on this site from last year for Halloween, so don't miss the napkin rings and other small, fun things.

I've never designed a lot of needlepoint for Halloween, as there seems to already be more than enough "out there," and it's also not really my interest for designing painted canvas or for stitching - I leave that to others who excel.

However, I have recently found a web site while cruising on ebay, that has just about sent me over the edge to be stitching on Halloween things!. These pieces are so much fun and so full of originality and personality, they are quite different from any I've seen. I've shown these on the other blog, but to be sure you don't miss it, I'll give you a link here for her Halloween page: Nenah's Needlepoint.

I won't show any canvases here, as that would spoil the surprise. Also, these aren't Freebies, of course, but the prices are so much less than they would be if offered in a retail store!! I love finding these wonderful things that I didn't know were available.

Sunday, September 5, 2010

More for a Halloween Table!

Last year I drew several Halloween napkin rings, but didn't stitch any of them myself - these you can find under the label "napkin rings." There were two I didn't finish drawing, but now have at least put enough on canvas to be able to do a complete one of each, and also pass them along for you to do your own.

The first is a simple one - a bat! I picture a black one stitched in basketweave with Petite Very Velvet, and glittering metallic eyes (Kreinik braid). Usually I make these 1 1/2" wide, which is the same width used for bracelets and belts - but this one, to accomodate the "moon," is 1 3/4" wide.

I have left the images for these a bit large so that when you print them out, you can clearly see where to put the dots onto your canvas when you draw them. Where I put the arrow, just ignore the long, curved line - I drew these things late one night when I was too tired to count, and kept making a mess of it - so gave up and called this a "scrap" and just left the line there. Again - IGNORE it.

As for stitching the bat, I visualize a moon against a navy sky - maybe with metallic stars on it - either silver or Kreinik 032 white, which is very sparkly.

The next is a witch on her broomstick - again, against a moon! My son said this is a self portrait I painted. I put a red scarf on it simply to separate the dotted elements of the drawing.


You could put color on this lady, or just make her a black silhouette - whatever suits you!! Just have fun, and enjoy these for table settings - very festive!

As for drawing them onto canvas, there are a number of blot posts here to instruct you - mostly under "canvas preparation."

Wednesday, September 1, 2010

'Tis the Season! (thinking about stitching)

Lest you think I've lost my mind (I probably have, and don't know it yet) - I decided I'm tired of looking at crazy quilts, so "retired" the September heart as a header, as I've used it two years in a row. (See these at my other blog, Possibilities, etc., under "Birthday Crazy Quilts")

I finished this piece last night as a napkin ring, as one of my "tartan adaptability and uses" experiments, and thought it might be suitable to point out that even tho' it's still horrendously hot (at least here in Austin), it's time to think about starting gifts, ornaments, table decorations, etc. for the upcoming gaiety of the seasons of fall into Christmas! (and don't forget Hanukkah!)
My next blog post here will be a new napkin ring motif or two, as these were fun last year, fast to stitch, and great for decorating a table. I'll probably change the header too, and show candy corn or something more appropriate! Meanwhile, there are lots of napkin ring patterns right here on this blog - just click on the label for them.
The illustrated napkin ring is adapted from the Alpine Meadlows tartan, and I have a more complete description on the other blog.

Friday, August 6, 2010

Planning Ahead! (It's August already)

It only occurred to me last night that it's August, and time to change the header here, and also to get busy (or busier). It's time to be thinking of things to start stitching for "the seasons." My year is kind of turned around, as I was doing coral reefs and seashells and fish in the middle of the coldest winter I can remember having in Austin.

Right now, I'm working on my article for the November/December issue of Needlepoint Now, as the deadline is in three weeks - and it's beastly horrible hot in Austin. Oh well, it's a good time to stay indoors and think and stitch. Anyway, I've neglected Freebies this last year or so, and not offering new things often enough - I'll try to do better starting soon - and definitely by September.

Sunday, February 14, 2010

An Egg with Memory Thread! (and a new blog)

"Tis the Season" to do an egg or two, and I'm loving what the ladies at DMC did with my little egg and their new Memory Thread.

"Emma Broidery" is doing a blog for them, where you may find this egg as a Freebie, as well as other interesting things to browse and for finding inspiration for your needlework - do go see it. The link is on the side bar under "Good Stuff."

Tuesday, February 9, 2010

A Delightful Valentine Freebie from Liz

For anyone who hasn't found Liz Morrow's beautiful blog, she has now added a web page with downloadable patterns - and a freebie, which changes regularly.

I wanted to share this delightful Valentine with you, and also couldn't resist the purchase, myself, of one of her gorgeous bargello patterns.Her bargello is so imaginative! These patterns may be delivered to your e-mail by PDF - or you can get them "hard copy" as she calls it.

The little picture I'm showing says "click to download" - but this was on Liz's site when I touched it with my mouse - so you have to go to her web page to do that.

Also, don't forget that these charts work equally well for needlepoint or counted X-Stitch. Each little square represents a stitch, which would be an X for cross stitch, and a tent stitch for needlepoint - a simple "translation."

Wednesday, February 3, 2010

Earrings for the Season: Needlepoint or Counted X-Stitch

This is one of those almost mindless activities that could keep me happy and busy for the whole day if I don't make myself put it down. I just call it "doodling on canvas," as I never use graph paper for designing. That takes time to color in little squares, and it doesn't give me a true picture of the way it will look on the correct size canvas anyway.
These little pictures will work on size 18 needlepoint canvas (you wouldn't want to use larger mesh for earrings) or 18 count Aida for counted X-stitch. For the X-stitch, just make the little X on the square wherever there is a dot on the needlepoint canvas - it's a very simple transition.

One converts X-stitch charts to needlepoint the same way - where there is a colored square, just make a tent stitch on the canvas.The four earrings in the top photo were drawn onto canvas on the odd number - 11 or 13, so that the heart would work, as it has to have a center stitch. These are small enough that one could add still another row of border.
The next photo shows the earrings a bit larger - by one or two threads, as they must be kept in the 3/4" diameter range to be attractive. They may be left square, or with the corners taken off, as in the kpicture of the Christmas set in the previous post.
Again, these are either odd or even count - the even count is necessary for the little blue flower (the red one in the previous post), as the center is a Smyrna Cross, as are the petals around it.
I have used Sharpie ultra-fine point permanent drawing pens to do this, as they are not for commercial purposes, so the drawing pens are fine - just not very pretty.
You might use beads, sparkling fibers of all kinds - just use your own imagination and make something special. I don't know how to finish needlepoint, but I've seen people on other blogs do this - and the earrings simply involve backings one can purchase at craft stores, I believe. Anyway - have fun with this! They are quick to do, so there is still time to wear them for a Valentine party.

Monday, October 19, 2009

The Velvet Pumpkin continues

I'm having a hard time staying indoors working a bit today, as it's one of those very rare days in Austin that we call "Santa Fe" weather - cool, sunny, dry, and beautiful.
Anyway, I've worked a little bit on this pumpkin, but for some reason couldn't get a clear picture of it today.
The first photo is from yesterday, where you can see by the lower arrow where I stopped going up on the weft threads in order to meet the line going down the warp when I get there.
The arrow on the left at the line of stitching shows the basketweave progressing down to that point. When it comes on down to where I stopped - it will make a smooth line without a break to distract the surface. Easy to do if one is always conscious of going DOWN on the warp, and UP on the weft. It becomes second nature, and also won't warp the canvas.
The second picture is blurry - but I tried it twice, and don't want to spend any more time today taking pictures - there is sunshine outside, and I have a lot of work to do inside. However, this one shows more clearly how nice the blending filament looks on his features - looks like flickering candle, I think.
The background has just a hint of shimmer, as I used the YLI ribbon floss shimmer blend in basketweave - only basketweave, as a textured stitch here would overshadow and distract from the central design.
I've just played around with this from time to time, and originally thought to make it a ball to sit on a table or shelf at the "season" - but just left it square, as I'm too lazy to plot the larger circle on the outside - should have done that before doing the smaller inner circle.
I decided a bit of bargello would be in order, as I purchased a card of Rainbow Gallery Petite Frosty Rays in black with a gold filament running through it - so had to find an excuse to use it. I do hope Liz Morrow isn't watching me and having a heart attack, as I made a really bad error in judgment and counting where the arrow is - bad job!! Oh well. I'm not the expert she is.

Thursday, October 8, 2009

A Very Velvet Pumpkin with Blending Filament Sparkle!

I really haven't gotten very far along with this, as it took me a while to decide what to do with it. It's a good one to demonstrate the simple beauty of blending filament - and I always enjoy using petite Very Velvet. This orange is great!!

The orange outline is plain DMC floss in a darker orange. The features are yellow floss with the addition of the blending filament, as supposedly there is a candle inside.

I'll do the background in YLI Ribbon Floss in black - but outside the circle, I'm not sure what, but probably bargello of some sort. Mitered, I'm sure. I had bought a while back, some Petite Frosty Rays in black with a gold thread through it - so will HAVE to use that. Good excuse!!
The close-up shows clearly the beauty of using the blending filament with floss for just a very subtle sparkle, randomly showing. The "how to" and "why" of doing this is posted on the other blog - Possibilities, Etc. I like to outline the shape before using a textured background - and this one is done by changing direction each quarter section so that there will be no "sawtooth" edges. You can see by just looking at the arrows.
I started at center top, and then at center side, just turned the canvas and kept going - thereby eliminating that sawtooth. Very neat and smooth for a small piece - and also, it makes it easier to stitch bargello around it.
The stem is also Petite Very Velvet, and the vines and leaves are DMC cotton floss.
The pattern for this piece is somewhere on the blog - probably under "napkin rings" - but this one is destined for a table ornament, or maybe a "kissing ball."

Monday, October 5, 2009

Stitching for Halloween: Jolly Roger, etc.

Pat Miller at Needleartnut very graciously offered to stitch my little series of napkin rings intended for fine decoration for the seasonal table, and is moving along with them nicely.
I'm delighted so far, as my imagination is for drawing and painting and not much for stitching - and I couldn't figure out what to do with them.
Anyway, do go take a look, and then perhaps get motivated to do some for yourself - under "napking rings" on this blog.

Saturday, August 29, 2009

For Halloween Decor

Playing with little Halloween motifs again - this time a bat and a witch. My thought, of course, was still for table settings and napkin rings, but Pat Miller, over at Needleartnut blog, suggested putting the little circles of my napkin rings onto larger circles, or even on diamond shapes, for ornaments on dowel sticks to make decorative and festive centerpieces. Pat is stitching my Jolly Roger pieces - so do go there and take a look, as her stitching is imaginative and thread choices are lots of fun!

I had also thought about stitching more circular background around them (even bargello) and making kissing balls to hang or to just sit on the dining table and on side tables for the "season."

Anyway, I have already given you a tutorial on drawing circles onto canvas - you can find these under the label "canvas preparation." This first circle is 3 1/8" diameter, and is good for inserting the smaller one (the moon) to make a small ornament. Actually, 3 1/2" would be better, but I can't find my drawing, and I'm too lazy right now to do another.
The second scan is the small circle, 2 3/8" diameter, that I use for the "moon" on the napkin rings. To insert it into the larger circle, draw the big one FIRST, mark the centers lightly, and then count up 21 threads from the horizontal center and make a mark to begin the top of the smaller circle. These center marks can be easily dotted out with white acrylic paint.
And now the new motifs! I had to give the bat green eyes, and the witch has a silver hat band and an orange scarf. I had intended just a black silhouette against the yellow/orange moon, but couldn't resist a bit of color here.
Enjoy! - and see what you can come up with for further decoration.


Thursday, August 27, 2009

Spook Season: The Jolie Rouge

I finally got this one done - the red version, which is thought to be the oldest form and the origin of the name "Jolly Roger." This was supposed to signify BLOOD and the fearsome things the pirates would do if the ship under attack didn't comply and "surrender the booty." The name means, in French, "pretty red."

Working now on a bat and a witch. These are on 18 mesh canvas for needlepoint - but could also be worked on the same count Aida for counted X-stitch.

Sunday, August 9, 2009

Halloween Time! Motifs for Projects in Needlepoint (or X-stitch)

I've neglected Freebies for a few weeks due to being incredibly busy - but this has been brewing in the back of my mind for quite a while. Today I needed a break, so have played on canvas all day, and think these might be fun.

First, my proudest achievement - the emblem from the Jolly Roger! I used a white Deco Color Paint Pen, fine point, to draw it on black canvas, which is what it needs. I'm thinking the canvas could be stitched with something open with a bit of sparkle in it, and would probably do the skull and crossbones in DMC Satin Floss for the high shine.

I'm showing the drawing on white canvas, as it would be easier to use as a guide for drawing your own, I think.

Next, the cat. This is a black cat against a moon - I didn't have time to paint them, but I think it's actually easier to work from the pictures of just the drawing. I thought to put the fence all the way across, which I'll probably do if I ever have time to stitch the full set.


As napkin rings in previous posts demonstrate, these should be 5 1/2" long, so you can simply mark the top and bottom lines across the canvas from the center - 2 3/4" each way. The band is just under 2" high, which is a little wider than my usual, which is 1 1/2".This cat, of course, should be solid black with a green beads placed for it's eye.

The moon would be a soft yellow, and the background maybe dark blue with a few silver or Kreinik #032 braid stars (dots) sprinkled around.

The spider is hanging from a silk thread, which I'll make with Kreinik silver braid on the warp (bump) stitches, and a bead on each of the weft stitches in between. I think the web might be fine in DMC Satin Floss in light grey or something of that sort. The spider definitely needs green beads for her eyes.


I did run these critters by the grandchildren to make sure they're identifiable, and they met with high approval and shouts of glee.

Last, the pumpkin. I didn't have time today to make it into a napkin ring, but it would fit well in this shape if the leaf on the left is eliminated. My thought with doing it on a small circle is that a larger circle could be worked around it, and maybe filled in with bargello - even 4-way.

As for threads for this, there is a Petite Very Velvet that is absolutely perfect for the pumpkin, with the outline done in a darker orange DMC floss!. I'll do the leaves, if I have time to do this one, with Satin Floss for the shine. The cut-outs on the face will be stitched with YLI black Shimmer Blend ribbon floss. Great effect with different textures!

Another way to use these motifs would be to put them on flatware holders. These look rather like large scissors cases, or what I've seen some designers do as "door tassels." About 5" high by 3" wide at the top. Great seasonal table decoration!

The round ornament could be finished on a styrofoam ball and sit on a festive table (with hat pins in the bottom) for a centerpiece.

If you haven't printed out these as patterns for your own use before, the easiest way I've found is to click on the image to enlarge, then click on "file" and "print preview." It will print out large enough to see easily and then you can draw it onto canvas. Experiment with different threads, etc. and have fun with your own creativity!