skip to main |
skip to sidebar
 I found this photograph, as I have found so many long forgotten, while cleaning out boxes after a major move of residence. This one is a scan of a photograph, as I painted it long before I had a digital camera and computer - a VERY long time ago.As I remember, I drew and painted this for a class I was teaching in trying out different techniques and canvas preparation. I think this is the one which led to my deciding to start using silk ribbon embroidery for flowers on crosses and then, later, crazy quilt adaptations. Anyway, over the next week or so, I intend to give you here the instructions, starting with cutting the canvas, in detail for drawing it onto canvas yourself - and then suggestions for stitching. There are plenty of tutorials on canvas preparation now here and on my other blog, Possibilities, etc., to help you know which pens and which paint to use, and how to use the paint brushes, etc. etc. This is a more advanced Freebie, and I hope you put it to good use and enjoy it!! Just please remember that it's for your own entertainment and for giving as gifts either as a painted canvas for stitching friends or as a stitched and finished piece - but NOT for sale as a painted canvas.For more detailed instructions for Painting Your Own Canvas, I have the book in two chapters now as an E-booklet on my web page, Elegant Whimsies. Under "our designs" just click on E-Books.I think this has confused some people who have only seen the coil bound version. This is the downloadable, much less expensive version, as you receive it almost immediately upon purchase, and may download and print it out yourself. I revised it and added a lot more color, newer materials and techniques.
 I worked very hard over the weekend, and astonished myself by finishing Chapter II and putting it onto the web page. Now I deserve a rest, and another "swim" with the coral reef critters. This chapter shows, mostly in pictures, detailed instruction in drawing the pattern, putting it onto canvas, and painting - even as to how to hold the paint brush and how to fill it with paint.This is a downloadable e-booklet that you can print out yourself, so may be purchased by those interested who are from countries outside the U.S.A., as there is no "mailing" involved except by e-mail.
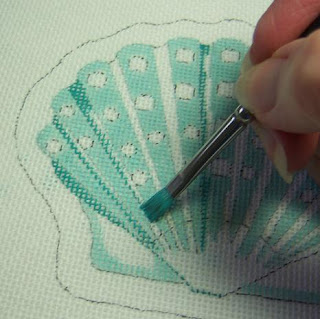 While painting things I have on order, I decided to go ahead and take pictures as I go, to explain things - pictures are clearer than words in these cases.I've been amazed to see in several publications the advice to buy cheap paint brushes. This is faulty information, as cheap brushes are difficult to use, time consuming, and downright aggravating for painting on needlepoint canvas.. They wear out so fast one actually spends more in replacing them. I've even seen some that shed bristles! I use, when I paint on needlepoint canvas with oils (my more serious and traditional designs require it) ONLY fine sable brights, which I purchase through my Dick Blick catalog. (a wonderful book for an artist to go through - I shop in this catalog like my daughters do in J. Crew) In these pictures, I'm using acrylic paint, which my sables don't like - but I'm out of the ones I use normally for painting with acrylics.
 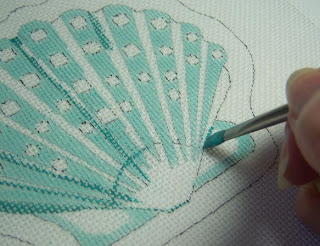 I'm illustrating here the fact that when using a good brush in really good condition, one can use a larger brush for several purposes, thereby cutting down on time in cleaning out one brush, putting it down and reaching for another, etc. This is a #4 size sable bright (NEVER use "shaders" as the bristles are long, so are too soft and flexible to squish the paint well down into the canvas). The picture shows that the brush, well cared for, can actually paint a thin line on just one thread of canvas! Then, turned, it can paint the flat areas as well. - very convenient.
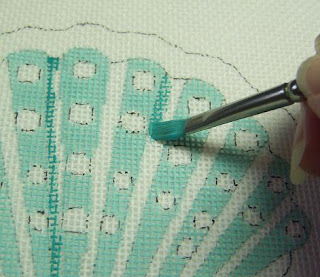 As for the flat areas, I do one side in this manner, and then turn the canvas and put the "chisel" edge against the opposite side, as it makes a smooth, clean line against the adjacent area.
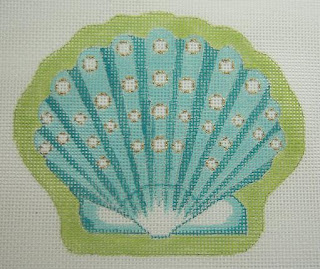 The last photo is the finished canvas. I used the Sakura Pen Touch fine line paint pen (gold) for outlining the "pearls." This was a great find for me, as it really cuts down on time spent painting gold outlines with paint and a brush. (and no brush to clean afterward) This scallop shell is from a series of "Jeweled Sea Treasures" I designed about six years ago. I had discontinued these, but kept the patterns - which is fortunate, as I had an order for several of them from a nice customer whose shop was buying from me then. The shells in the series were based on actual sea shells, anatomically correct, but I painted them in the bright pastel "Caribbean" colors, and added jewels, which were mostly stitched with Renaissance Shimmer and Sprinkles in smyrna cross and other "bump" stitches.ADDENDUM: I do have a book on "Paint Your Own Canvas" - which is available in my web store, Elegant Whimsies. It's listed as an "e-book" in two chapters, which you may download and print out yourself at about half the price of the bound book also showing - Just click on "E-Books" under "Our Designs"Be sure to also click on the "labels" below to see more canvas painting instruction - and also on the other blog, Possibilities, etc.
 I found this photograph, as I have found so many long forgotten, while cleaning out boxes after a major move of residence. This one is a scan of a photograph, as I painted it long before I had a digital camera and computer - a VERY long time ago.




